
This article is all setting up NFS for MicroZed Zynq AVNET. It becomes extremely easy if we have NFS setup for development process. There are two sides of NFS - client and server. The client is the Zedboard and the server is the Ubuntu 18.04. First we will go through the server side like what configration we need to do in order to support NFS.
NFS Server Installation - I didn’t have to install NFS server on Ubuntu 18.04. It supported the NFS by default. In case you don’t have you can install or re-install the NFS Kernel server.
$sudo apt-get install --reinstall nfs-common nfs-kernel-serverSetup for NFS Server - I am using Ubuntu 18.04 on Windows 10 host machine. I had a little trouble in getting the NFS server running on Ubuntu 18.04. But, I figured out that Ubuntu 18.04 was disabled for nfs version 2. However, my embedded linux was using NFS version 2.
How to find what NFS Server version is enabled or disabled by Ubuntu
$sudo cat /proc/fs/nfsd/versions
  -2 +3 +4 +4.1 +4.2
The ‘-2’ here tells that the nfsd is disabled for the version number ‘2’. Thus, we need to enable the version 2 for NFS server.
How to enable NFS Server version 2 in Ubuntu
Go to the following file.
$sudo gedit /etc/default/nfs-kernel-server Now, edit this file to include the version 2. First, find the line saying - “RPCNFSDCOUNT=8”. Change this to include Version 2 also. Update/edit as follows to enable NFSv2 on Ubuntu Linux.
# Number of servers to start up
RPCNFSDCOUNT="8 -V 2"
Here is how my entire file looks like.
# Number of servers to start up
RPCNFSDCOUNT="8 -V 2"

# Runtime priority of server (see nice(1))
RPCNFSDPRIORITY=0

# Options for rpc.mountd.
# If you have a port-based firewall, you might want to set up
# a fixed port here using the --port option. For more information,
# see rpc.mountd(8) or http://wiki.debian.org/SecuringNFS
# To disable NFSv4 on the server, specify '--no-nfs-version 4' here
RPCMOUNTDOPTS="--manage-gids"

# Do you want to start the svcgssd daemon? It is only required for Kerberos
# exports. Valid alternatives are "yes" and "no"; the default is "no".
NEED_SVCGSSD=""

# Options for rpc.svcgssd.
RPCSVCGSSDOPTS=""
Now, restart the NFS Kernel service.
$sudo systemctl restart nfs-kernel-server.service*Check the nfsd version afterwards
cat /proc/fs/nfsd/versions
+2 +3 +4 +4.1 +4.2
+2 means it is enabled.
How to check the NFS Server status Ubuntu 18.04 uses Systemd to manage services. In order to check the nfs server status. We could run the following command.
shreyas@shreyas-VirtualBox:~$sudo systemctl status nfs-server
● nfs-server.service - NFS server and services
   Loaded: loaded (/lib/systemd/system/nfs-server.service; enabled; vendor preset: enabled)
   Active: active (exited) since Fri 2020-03-06 12:36:08 AEST; 11min ago
  Process: 2908 ExecStopPost=/usr/sbin/exportfs -f (code=exited, status=0/SUCCESS)
  Process: 2907 ExecStopPost=/usr/sbin/exportfs -au (code=exited, status=0/SUCCESS)
  Process: 2906 ExecStop=/usr/sbin/rpc.nfsd 0 (code=exited, status=0/SUCCESS)
  Process: 2917 ExecStart=/usr/sbin/rpc.nfsd $RPCNFSDARGS (code=exited, status=0/SUCCESS)
  Process: 2916 ExecStartPre=/usr/sbin/exportfs -r (code=exited, status=0/SUCCESS)
 Main PID: 2917 (code=exited, status=0/SUCCESS)

Mar 06 12:36:07 shreyas-VirtualBox systemd[1]: Starting NFS server and services...
Mar 06 12:36:08 shreyas-VirtualBox systemd[1]: Started NFS server and services.
How to export the microzed root file system in Ubuntu 18.04 You need to be very careful while extracting the microzed root file system. If accidentally, you place the microzed root file system on your machine’s root file system then nothing will work. The reason is that microzed root file system is built for ARM and not X86. So, be super careful while extracting the microzed root file system. Here is how I do.
 $mkdir -p /home/shreyas/rootfs_microzed
 $cd /home/shreyas/rootfs_microzed
 $tar -xvf core-image-minimal-microzed-zynq7-20200228041644.rootfs.tar.gz ./
How to give appropriate permission to the microzed rootfile system
sudo chown nobody:nogroup rootfs_microzedHow to export the root file system so that it can be read by the NFS client This is pretty important step, we should be able to export the folder so that the NFS client can read it. Go to the /etc/exports file first. Add the following line to tell that you want to share this folder rootf_microzed using the interface 11.11.0.0/16. Thus, any client who are in the same subnet can read this folder. You could have given * instead of 11.11.0.0/16 to export to the world.
$sudo vim /etc/exports
$/home/shreyas/rootfs_microzed  11.11.0.0/16(rw,nohide,insecure,no_root_squash,no_subtree_check,sync)
Now, run the following command to see whether you are exporting this folder correctly or not. The below command and the output tells me that I am exporting the rootfs_microzed folder through 11.11.0.0/16 interface.
shreyas@shreyas-VirtualBox:~/microzed/poky/u-boot-xlnx(master)$sudo exportfs
[sudo] password for shreyas:
/home/shreyas/rootfs_microzed
		11.11.0.0/16
Other primary services to check for You need to ensure that these services are running properly. Otherwise, the above command can fail.
$sudo systemctl enable rpcbind.service
$sudo systemctl enable nfs-kernel-server
How to re-export the NFS kernel server folder This pretty simple. You just need to run the following command in order to re-export the folders.
$sudo exportfs -raHow to tell firewall to allow the NFS connection I didn’t get into this problem but you could use the following command to tell the iptables i.e linux firewall to allow any connection coming from the interface 11.11.0.0/16. Probably, it is not a secure way to allow NFS connection but if it is a private connection then it really doesn’t matter.
$sudo ufw allow from 11.11.0.0/16 to any Setup for NFS Client - Zynq Zedboard This is pretty straight forward. If you have followed my tutorial on bringing up zedboard then this is pretty straight forward. By default kernel configuration, the zynq zedboard will enable the NFS version 2.
Setting up Bootargs This is pretty important step. What I have done is that I have changed the uboot uEnv.txt bootargs to
bootargs=earlyprintk console=ttyPS0,115200 root=/dev/nfs ip=dhcp nfsroot=11.11.11.19:/home/shreyas/rootfs_microzed rw rootwait devtmpfs.mount=1or you can change the bootargs on the uboot prompt.
set bootargs "earlyprintk console=ttyPS0,115200 root=/dev/nfs ip=dhcp nfsroot=11.11.11.19:/home/shreyas/rootfs_microzed rw rootwait devtmpfs.mount=1"Here 11.11.11.19 is my Ubuntu 18.04 interface IP address. So, the above command will read the NFS folder rootfs_microzed from the nfs server 11.11.11.19. The earlyprintk ensures that we see some log messages on the serial port until the kernel serial port is setup by the kernel. The console parameters are same - device - ttyPS0 and the baud rate 115200.
Here is the core-image-minimal-microzed-zynq tar rootfs tar file for you to download. microzed root fs
Troubleshooting NFS in general
Ensure that the embedded zynq kernel has the following configuration turned on.
CONFIG_ROOT_NFS=y
CONFIG_NFS_FS=y
CONFIG_NFS_V2=y
CONFIG_NFS_COMMON=y
CONFIG_LOCKD=y
CONFIG_LOCKD_V4=y
Here is the way to check these configurations in yocto
bitbake -c menuconfig virtual/kernelIn case the above command fails, then do install the ncurses package so that the graphics can be rendered.
$sudo apt-get install ncurses-develNow, check the NFS configuration in the kernel, in the menuconfig do the following. Escape and forward slash i.e. ‘/’ and type NFS in the search configuration parameter window. You should check for NFS_COMMON , NFS_FS, NFS_V2, ROOTFS_NFS. They all should be set to ‘y’.
After changing the menuconfig, you might need to recompile the kernel. In Yocto, we do this using the following command.
$bitbake virtual/kernel -c cleansstate
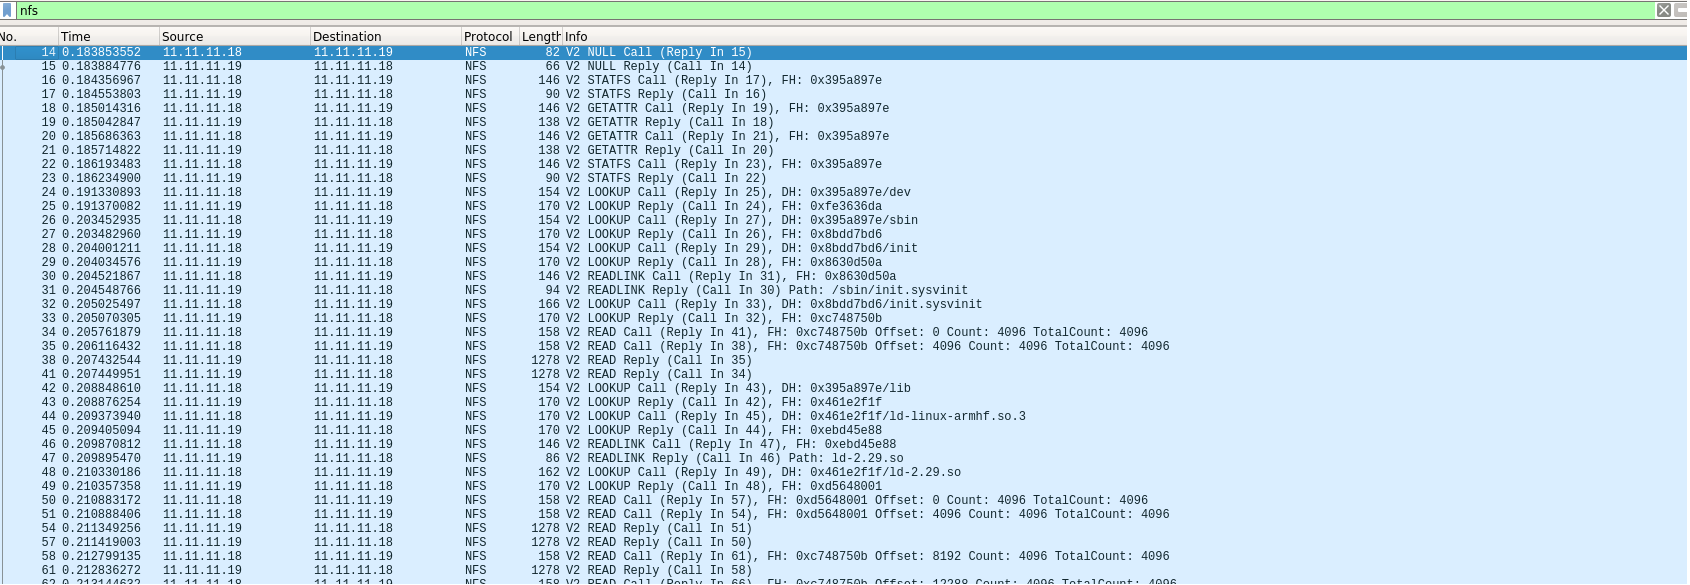
$bitbake virtual/kernel -c compile -fAlso, if it is still not working then it worth to check using wireshark and check for NFS protocol. Here is the screen shot of wireshark. You should see something like this. Here 11.11.11.19 is the server ip address and 11.11.11.18 is the NFS client i.e. zynq zedboard.
This brings an end to this article.