
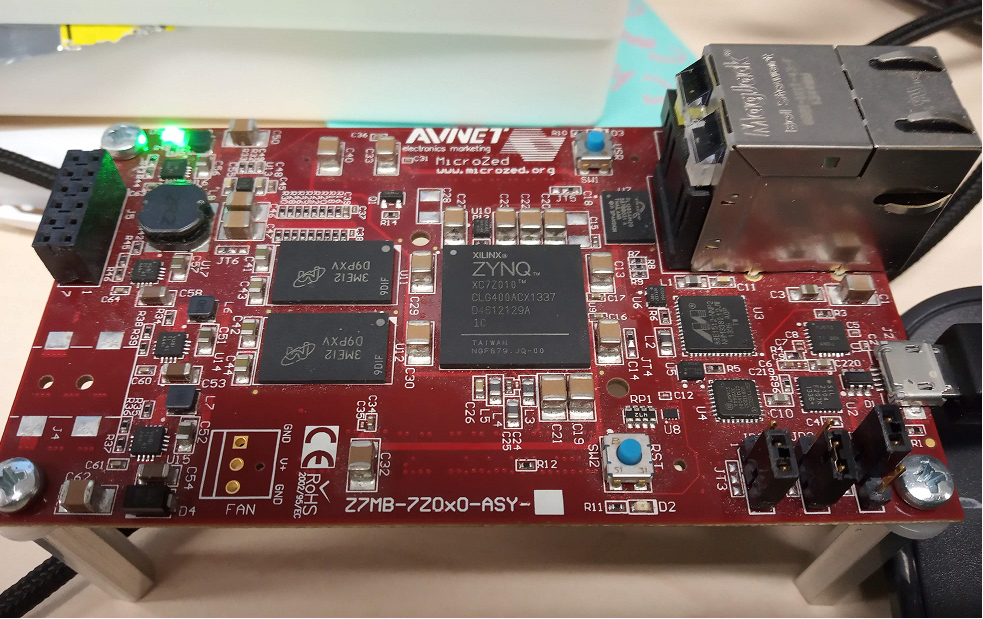
This article is all about building and generating the u-boot (SPL) image, linux kernel, device tree and root file system for the Avnet Zedboard 7010. Also, I will touch on how to create the fpga bit stream to program the Programming logic(PL). I have no experience in fpga but I would like to touch the fpga bit stream topic for the sake of completeness. Basically, a fully functional system where we can do tweaks later on. This is all about setting up the foundation to load the operating environment on the Avnet microZed using sd card/mmc. The model name is Z7MB-7z0x0-ASY.
Motivation to do this?
I don’t want to use Petalinux which abstracts a lot of details from the user. Instead, I would like to use Yocto build system. Here, in this blog, I am using warrior release of yocto.
Setup - I am using Ubuntu 18.04 on Windows 10 host machine. I had a little bit of trouble finding what version of virtual box works with Ubuntu 18.04. I found that the version Virtual box 6.1.2 running guest OS - Ubuntu 18.04 works well on Windows 10 host machine. Here is the link - virtualboxForum Make sure you install the guest additions too for 6.1.2. Before you run the Guest Addition program, ensure you have installed the build-essential linux-headers-generic. Also, you might have to install build-essential gcc make perl dkms. I have given 50Gb to create Ubuntu virtual machine that should be sufficient to build the entire operating environment for microZed board.
Pre-requisite
Install the essentials in order to use Yocto.
Ubuntu and Debian The essential and graphical support packages you need for a supported Ubuntu or Debian distribution are shown in the following command:
	 $sudo apt-get install gawk wget git-core diffstat unzip texinfo gcc-multilib \
     build-essential chrpath socat cpio python python3 python3-pip python3-pexpect \
     xz-utils debianutils iputils-ping python3-git python3-jinja2 libegl1-mesa libsdl1.2-dev \
     pylint3 xterm
Create your workspace.
$ mkdir -p microzed
$cd microzed

git clone -b <branch> <remote_repo>
The branch I am going to use here is Warrior. Checkout Poky - Warrior.
git clone -b warrior git://git.yoctoproject.org/poky

cd poky <Get inside the poky folder
Layers we are using
a) meta-openembedded  and what it provides - read README -  [meta-openembedded](https://github.com/openembedded/meta-openembedded/blob/master/README)
b) meta-sourcery  and what it provides - read README - [meta-sourcery](https://github.com/MentorEmbedded/meta-sourcery/blob/master/README.md)
c) u-boot-xlnx  and it provides u-boot - read README - [u-boot-xlnx](https://github.com/Xilinx/u-boot-xlnx/blob/master/README)
d) meta-ezynq and it provides - read README - [meta-ezynq](https://github.com/Elphel/meta-ezynq/blob/master/README.md)
d) meta-external-toolchain and it is needed by meta-sourcery.
e) meta-xilinx and it provides the definition for the machine microzed-zynq7 - read README - [meta-xilinx](https://github.com/Xilinx/meta-xilinx/blob/master/README.md)
Inside the poky folder, checkout these layers.
1)git clone -b warrior https://github.com/openembedded/meta-openembedded.git
2)git clone -b warrior https://github.com/MentorEmbedded/meta-sourcery.git
3)git clone -b master https://github.com/Xilinx/u-boot-xlnx.git
4)git clone -b warrior https://github.com/Elphel/meta-ezynq.git
5)git clone -b warrior git://git.yoctoproject.org/meta-external-toolchain
6)git clone -b warrior https://github.com/Xilinx/meta-xilinx.git
Initialize the build
This source command will create a build directory and will cd into build directory. The build directory will have the template for local.conf and bblayers.conf. Here is the command.
a) cd poky
b) source oe-init-build-env
Let’s edit bblayers.conf to add layers to the recipe.
$kate conf/bblayers.conf
# POKY_BBLAYERS_CONF_VERSION is increased each time build/conf/bblayers.conf
# changes incompatibly
POKY_BBLAYERS_CONF_VERSION = "2"

BBPATH = "${TOPDIR}"
BBFILES ?= ""

BBLAYERS ?= " \
  ${TOPDIR}/../meta \
  ${TOPDIR}/../meta-poky \
  ${TOPDIR}/../meta-yocto-bsp \
  ${TOPDIR}/../meta-openembedded/meta-oe \
  ${TOPDIR}/../meta-external-toolchain \
  ${TOPDIR}/../meta-sourcery\
  ${TOPDIR}/../meta-ezynq\
  ${TOPDIR}/../meta-xilinx/meta-xilinx-bsp \
  "
Now, edit local.conf to tell what machine architecture we are building for.
$kate conf/local.conf
MACHINE ?= "microzed-zynq7"
Now, you are good to go. Let’s build the Secondary Program Loader (SPL) u-boot image. The SPL image replaces the need for first stage boot loader i.e. fsbl.
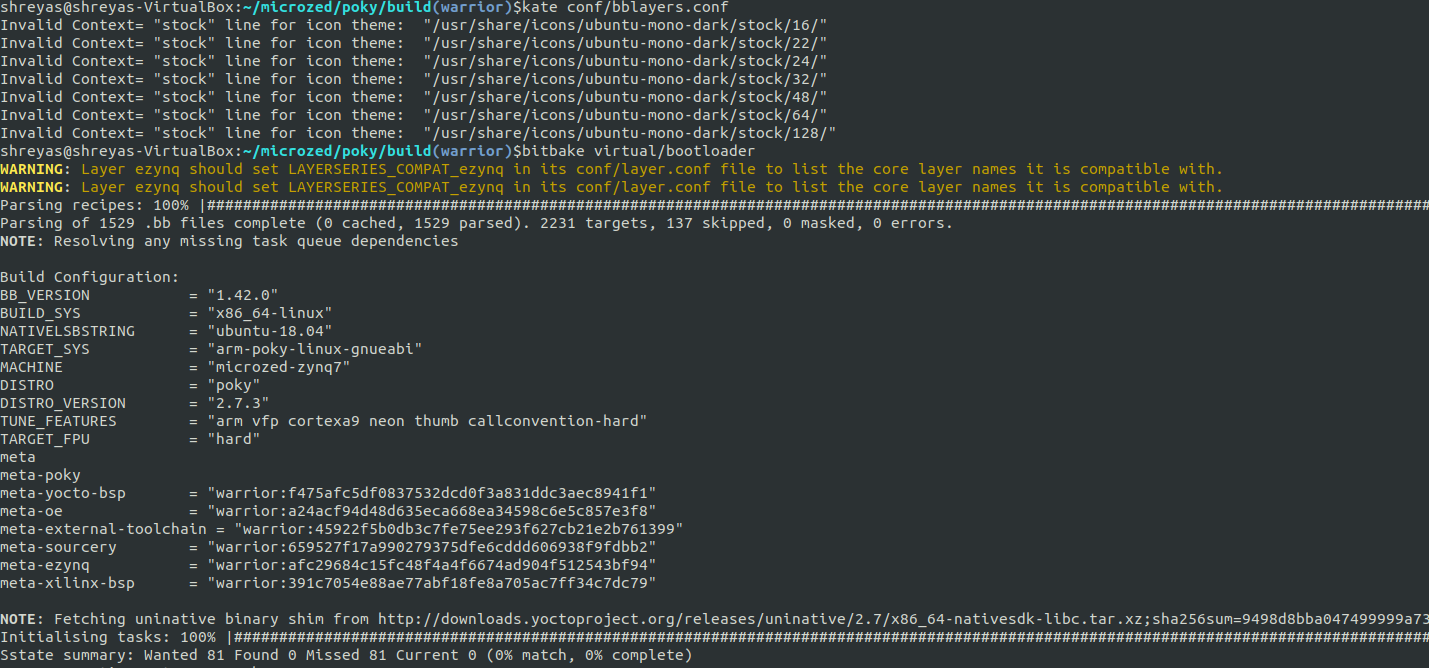
Build U-Boot This will create boot.bin, u-boot.img.
$ bitbake virtual/bootloaderBuild minimal working uImage, dtb and rootfile system
$bitbake core-image-minimalThis is how it looks on the terminal.
Generating fpga bit stream for microZed.
In order to build fpga bit stream, we will use Vivado. I have installed Vivado on my Windows 10 machine.
By default, Vivado doesn’t have board files for microzed zynq 7010 from AVNET. So, we need to download the board files of microzed zynq7. Here is the link to download the board files. If the link doesn’t exist then you can also do a google search for microzed-zynq7 board files.
Some people use Xilinx Vitis IDE to generate FPGA program. The most popular language for FPGA is VHDL. Vitis
zynq-microzed-7010x-board-definition
Copy the board definition files at the location -
C:\Xilinx\Vivado\2018.1\data\boards\board_filesor if you are not a regular Windows OS user, then you can use this link for reference Vivado_Board_File_Installation
Now, you should be able to select the board for Zynq-7010x. I have followed this tutorial to generate the bitstream
Here is my fpga project.
Once you run it, Vivado generates the bit file in runs\impl_1 folder in the project directory.
Prepare hardware system
1) Setup the Jumper settings accurately to do sdboot

Follow this - [AVNET Getting Started](http://zedboard.org/sites/default/files/documentations/MicroZed_GettingStarted_v1_0.pdf )

see Page 11.

2) Prepare sd card.

a) Partition the sd card into two partition.

i) FAT 32 - maximum 800 MB is good enough.
ii) EXT4 -  Rest of the sd card space.
I use gpart application to do the partitiion. You need to enable USB in the virtual box. You might need to restart the virtual box after enabling the usb device.
Now copy, boot.bin, devicetree.dtb, u-boot.img uEnv.txt and uImage in the FAT partitiion. Also, if you have created the fpga bit stream then you could copy the fpga bit stream here.
boot.bin is the SPL image and it will look for u-boot.img. u-boot.img will look for devicetree.dtb to set parameters for the kernel. For e.g, what clock rate, i2c devices the board needs is all defined in the devicetree. uImage i.e Kernel will refer to the device tree in order to configure and probe the required drivers. When the kernel starts, it reads this file (called dtb for Device Tree Binary) to know the devices on the board, and initialize useful drivers. Basically, SPL image uses PS7 i.e. processor system ps7_init.c and ps7_init.h from the xilinix board. In case you are not using microzed zynq, then you might need to generate ps7_init.c and ps7_init.h using xilinix tool. Next, you need to copy these files to uboot-xilinx. The PS7_init.c does a lot of things like - resetting the SLCR - System level control registers and rom boot loader. It starts by resetting the processor.
Copy Root File System
Mount EXT4 to some
tar -C <mountpoint> -xzpf rootfs.tar.gzPoking with u-boot environment.
By default, my system had the following sdboot value.
sdboot=echo Copying Linux from SD to RAM... && mmcinfo && run mmc_loadbit_fat && fatload mmc 0 0x3000000 ${kernel_image}
&& fatload mmc 0 0x2A00000 ${devicetree_image} && fatload mmc 0 0x2000000 ${ramdisk_image} && bootm 0x3000000 0x2000000 0x2A00000
ramdisk_image=uramdisk.image.gz
Here you can see, it is trying to boot the ramdisk image i.e. rather than mounting the root file system, it’s going to load the root file system on the RAM.
By the way, when you build, you must be wondering where is uramdisk.image.gz. Basically uramdisk.image.gz is nothing but
"uramdisk.image.gz" is just another name for "*.cpio.gz.u-boot"So, if you don’t want to mount ext4 partitiion, you can use ramdisk_image. Otherwise, you can change the sdboot to
setenv sdboot 'echo Copying Linux from SD to RAM... && mmcinfo && run mmc_loadbit_fat && fatload mmc 0 0x3000000 ${kernel_image} && fatload mmc 0 0x2A00000 ${devicetree_image} && bootm 0x3000000 - 0x2A00000'Loading the fpga bit stream
I have given a name to the fpga bit stream as custom_ip.bit here.
fatload mmc 0 ${loadbit_addr} custom_ip.bit
fpga loadb 0 ${loadbit_addr} $filesize
Setting the u-boot environment
setenv mmc_loadbit_fat 'echo Loading bitstream from SD/MMC/eMMC to RAM.. && mmcinfo && fatload mmc 0 ${loadbit_addr} ${bitstream_image} && fpga loadb 0 ${loadbit_addr} ${filesize}'Please note that I am using fpga loadb in order to load the bitstream. There is no translation required in order to load the fpga bitstream generated from Vivado.
EXT4 Root File System
Telling uboot to mount the rootfile system from where?
This is to identify from where kernel should mount the root file system.
In my case, I did the following in my u-boot.
Zynq> mmc part

Partition Map for MMC device 0  --   Partition Type: DOS

Part    Start Sector    Num Sectors     UUID            Type
  1     2048            1433600         f2ccc02a-01     0b Boot
  2     1435648         6133760         f2ccc02a-02     83
Now, this tells me that my ext4-root file system is at mmcblk0p1 mmcblk 0 is the first sd card and p1 is the second block.
Now, set the u-boot environment variable bootargs, which eventually is passed to the kernel. Kernel uses this environment variable to set the console, root file system and other parameters.
set bootargs earlyprintk console=ttyPS0,115200 root=/dev/mmcblk0p1 rw rootwait devtmpfs.mount=1There are many commands supported by the u-boot. Here is the help.
Zynq> help
?       - alias for 'help'
base    - print or set address offset
bdinfo  - print Board Info structure
blkcache- block cache diagnostics and control
boot    - boot default, i.e., run 'bootcmd'
bootd   - boot default, i.e., run 'bootcmd'
bootefi - Boots an EFI payload from memory
bootelf - Boot from an ELF image in memory
bootm   - boot application image from memory
bootp   - boot image via network using BOOTP/TFTP protocol
bootvx  - Boot vxWorks from an ELF image
bootz   - boot Linux zImage image from memory
clk     - CLK sub-system
cmp     - memory compare
coninfo - print console devices and information
cp      - memory copy
crc32   - checksum calculation
dcache  - enable or disable data cache
dfu     - Device Firmware Upgrade
dhcp    - boot image via network using DHCP/TFTP protocol
dm      - Driver model low level access
echo    - echo args to console
editenv - edit environment variable
env     - environment handling commands
exit    - exit script
ext2load- load binary file from a Ext2 filesystem
ext2ls  - list files in a directory (default /)
You can view the current environment variables using the following command.
Zynq> printenv
baudrate=115200
bitstream_image=custom_ip.bit
bitstream_size=0x3DBAFC
bootargs=earlyprintk console=ttyPS0,115200 root=/dev/mmcblk0p2 rw rootwait devtmpfs.mount=1
bootcmd=run $modeboot
bootdelay=3
devicetree_image=devicetree.dtb
devicetree_size=0x20000
ethact=Gem.e000b000
ethaddr=00:0a:35:00:01:22
fdt_high=0x20000000
fdtcontroladdr=3eb2de28
fileaddr=100000
filesize=1fcc0c
initrd_high=0x20000000
ipaddr=11.11.11.103
jtagboot=echo TFTPing Linux to RAM... && tftp 0x3000000 ${kernel_image} && tftp 0x2A00000 ${devicetree_image} && tftp 0x2000000 ${ramdisk_image} && bootm 0x3000000 0x2000000 0x2A00000
kernel_image=uImage
kernel_size=0x500000
loadbit_addr=0x100000
mmc_loadbit_fat=echo Loading bitstream from SD/MMC/eMMC to RAM.. && mmcinfo && fatload mmc 0 ${loadbit_addr} ${bitstream_image} && fpga loadb 0 ${loadbit_addr} ${filesize}
modeboot=sdboot
nandboot=echo Copying Linux from NAND flash to RAM... && nand read 0x3000000 0x100000 ${kernel_size} && nand read 0x2A00000 0x600000 ${devicetree_size} && echo Copying ramdisk... && nand read 0x2000000 0x620000 ${ramdisk_size} && bootm 0
x3000000 0x2000000 0x2A00000
nfsdir=/home/shreyas/zynq
norboot=echo Copying Linux from NOR flash to RAM... && cp 0xE2100000 0x3000000 ${kernel_size} && cp 0xE2600000 0x2A00000 ${devicetree_size} && echo Copying ramdisk... && cp 0xE2620000 0x2000000 ${ramdisk_size} && bootm 0x3000000 0x200000
0 0x2A00000
othbootargs=init=/bin/bash
qspiboot=echo Copying Linux from QSPI flash to RAM... && sf probe 0 0 0 && sf read ${loadbit_addr} 0xC00000 ${bitstream_size} && mw 0xF8007080 0x30800100 0x4 && fpga load 0 ${loadbit_addr} ${bitstream_size} && sf read 0x3000000 0x100000
${kernel_size} && sf read 0x2A00000 0x600000 ${devicetree_size} && echo Copying ramdisk... && sf read 0x2000000 0x620000 ${ramdisk_size} && bootm 0x3000000 0x2000000 0x2A00000
ramdisk_image=uramdisk.image.gz
ramdisk_size=0x5E0000
sdboot=echo Copying Linux from SD to RAM...  && mmcinfo && run mmc_loadbit_fat && fatload mmc 0 0x3000000 ${kernel_image}  && fatload mmc 0 0x2A00000 ${devicetree_image} && bootm 0x3000000 - 0x2A00000
serverip=11.11.11.3
silent=n
stderr=serial@e0001000
stdin=serial@e0001000
stdout=serial@e0001000
U-Boot runs code placed in (processor’s) RAM, although it can also read data from other media. The boot process normally takes place in two steps:
1) Reading the OS image from media (Ethernet, flash, USB, MMC) into RAM
2) Jumping to the first instruction of the image in RAM
In order to read an image from an MMC card formatted in FAT, the command is:
fatload mmc <dev>[:partition] <loadAddress> <bootfilename>bootm This command starts a kernel image running.
bootm <address of kernel> <address of ramdisk> <address of dtb>In our case, we are not using ramdisk so ‘-‘ in the middle.
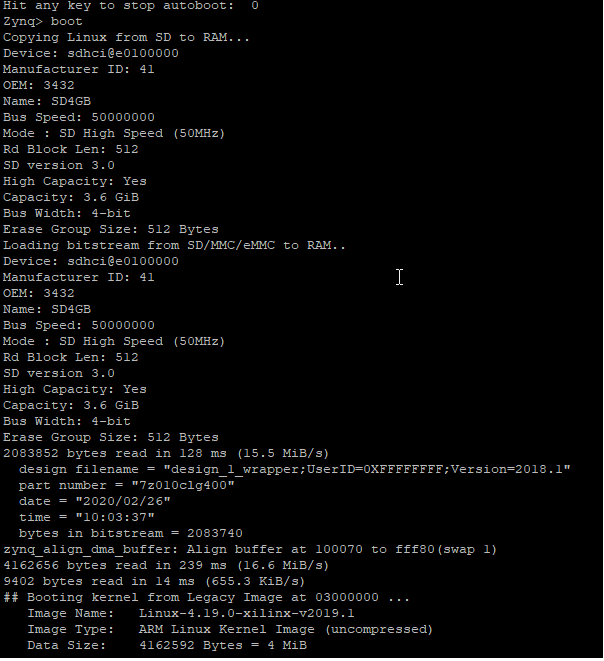
bootm <address of kernel> - <address of dtb>Here is the entire system.
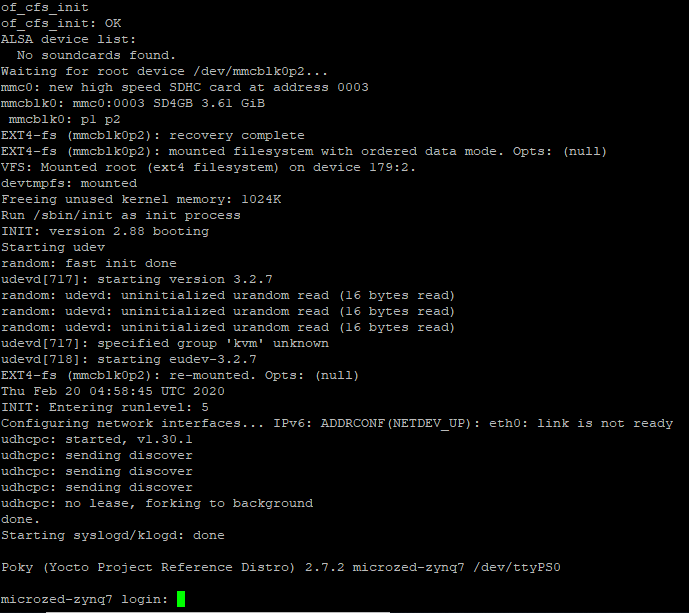
Here is the root file system mounted.
FSBL based
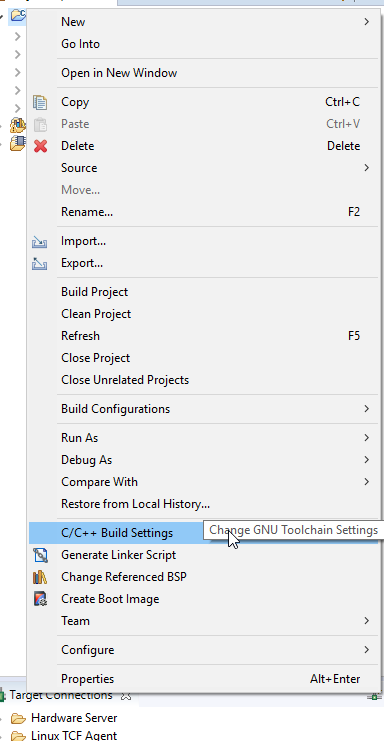
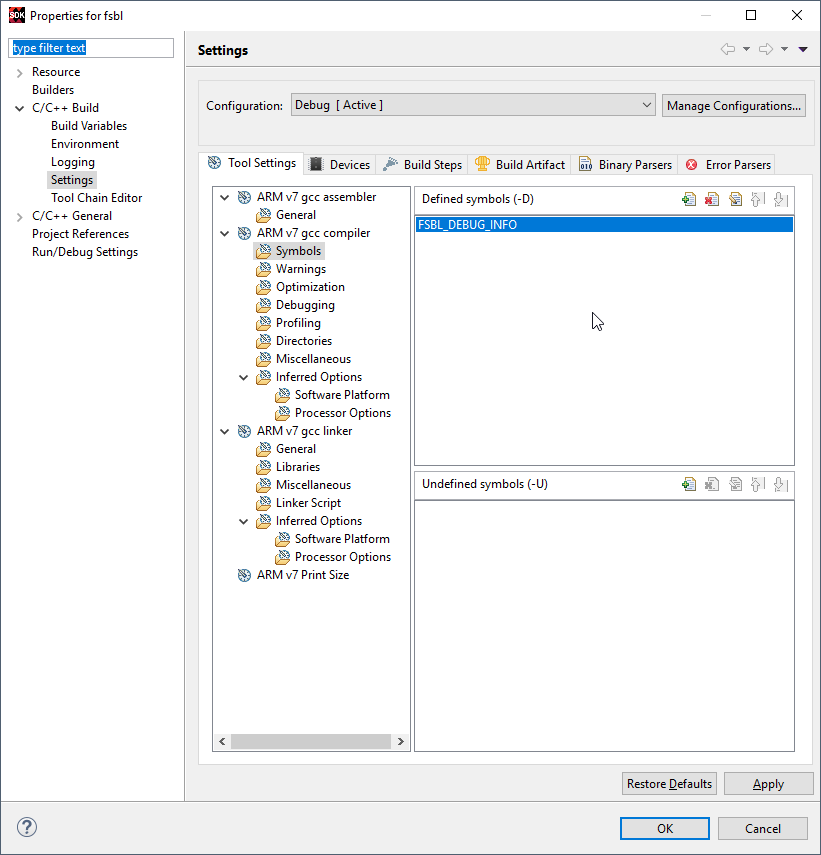
Instead of SPL image, you can use FSBL too. In order to generate FSBL, you need to use Xilinx SDK. Also, I will suggest that it is a better idea to enable FSBL_DEBUG_INFO in order to see whether FSBL is working or not. Here is how you enable the FSBL_DEBUG_INFO in order to troubleshoot the FSBL based image. I haven’t tried building up the entire system using FSBL. However, I was able to load the FSBL image successfully. Personally, I recommend to use SPL rather than FSBL.
Here is the link to download the tutorial for FSBL based AVNET ZYNQ-7010.
I strongly suggest to use SPL image rather than FSBL since if you get stuck with something then you have no support but to use peta-linux only.
Here is the link to download the ZedboardImage.
Here are the jumper settings to change the boot mode to JTAG, QSPI or SD Card.
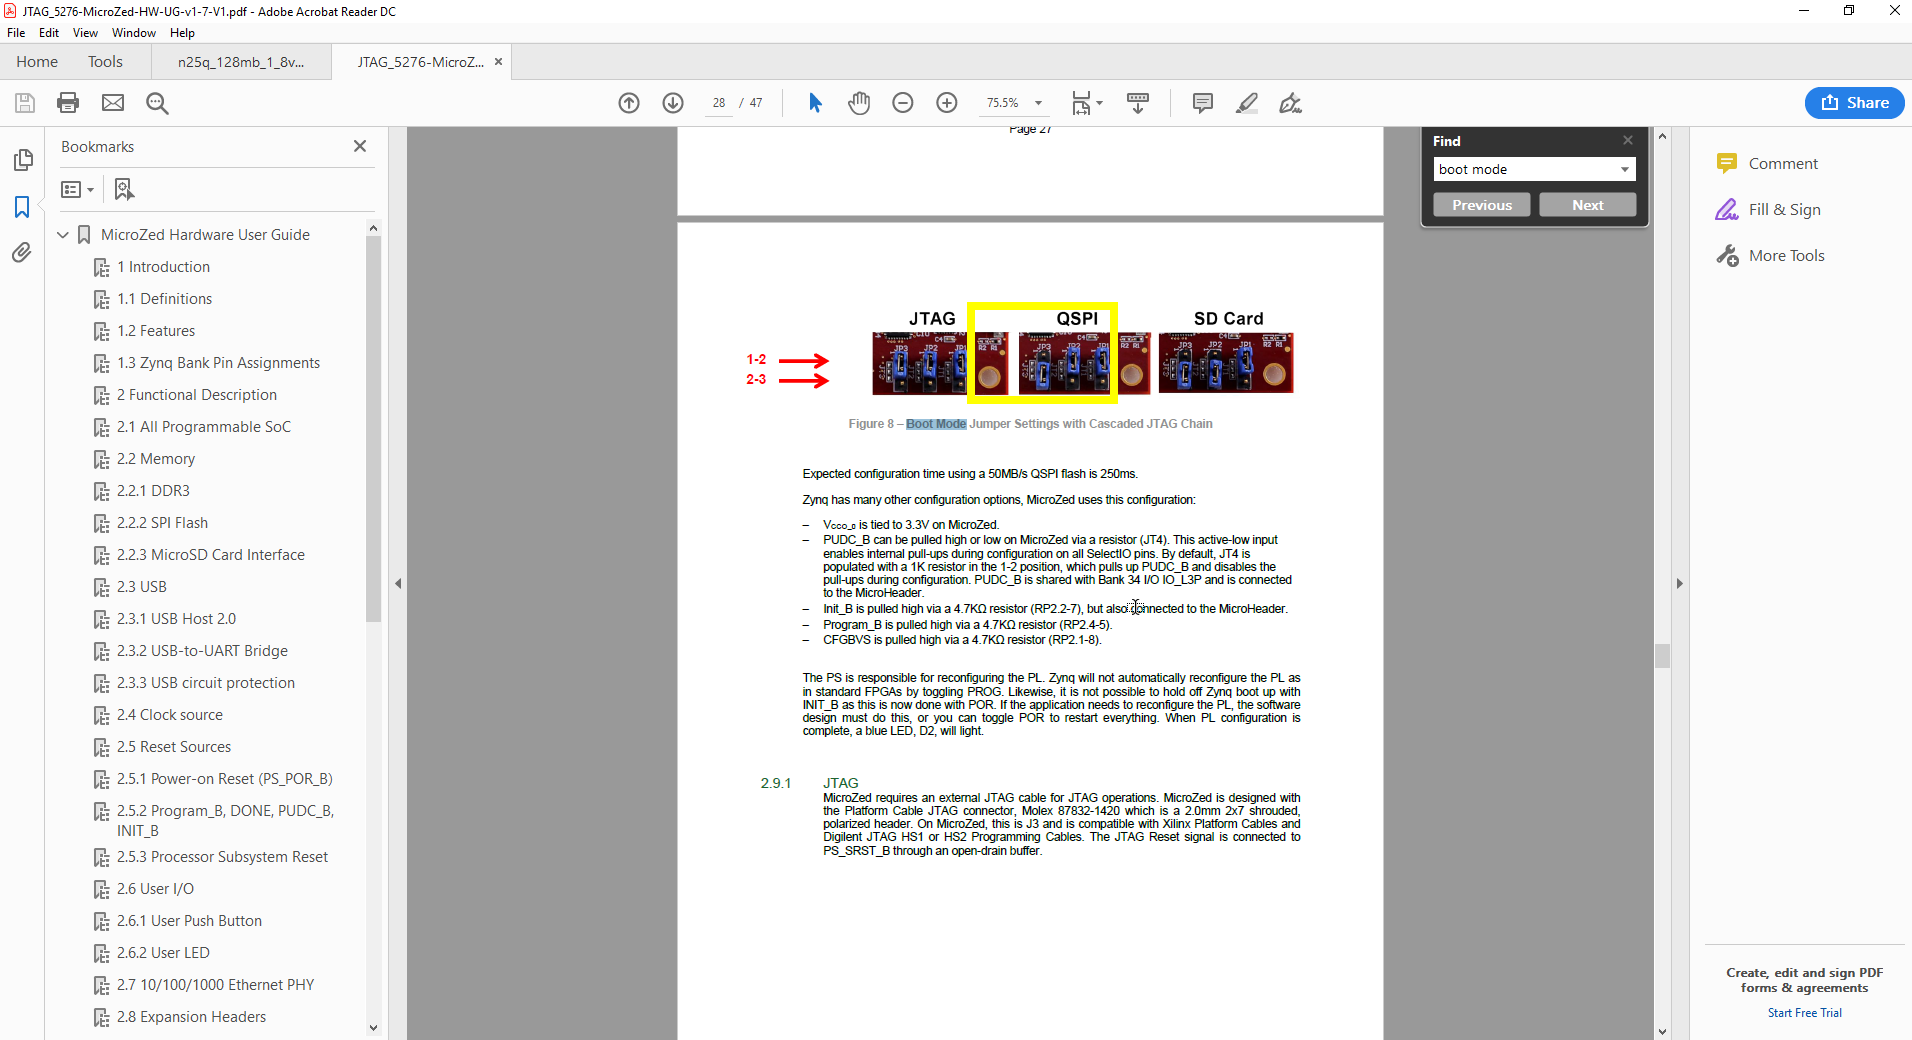
Also, you can read the entire guide on setting.
This brings an end to this article. Here is the entire embedded system running.