<?xml version="1.0" encoding="utf-8"?><feed xmlns="http://www.w3.org/2005/Atom" ><generator uri="https://jekyllrb.com/" version="3.10.0">Jekyll</generator><link href="https://joshis1.github.io/feed.xml" rel="self" type="application/atom+xml" /><link href="https://joshis1.github.io/" rel="alternate" type="text/html" /><updated>2026-11-07T06:12:43+00:00</updated><id>https://joshis1.github.io/feed.xml</id><title type="html">Shreyas Joshi | Leadership, Java &amp;amp; Systems</title><subtitle>Notes on technical leadership, Java, software design, Linux, and the systems behind reliable products.</subtitle><author><name>Shreyas Joshi</name></author><entry><title type="html">How I Passed RHCSA on RHEL 10: Practical Lessons and Preparation Tips</title><link href="https://joshis1.github.io/em_technical_spine/2026/07/12/RHCSA_Pass.html" rel="alternate" type="text/html" title="How I Passed RHCSA on RHEL 10: Practical Lessons and Preparation Tips" /><published>2026-07-12T10:30:00+00:00</published><updated>2026-07-12T10:30:00+00:00</updated><id>https://joshis1.github.io/em_technical_spine/2026/07/12/RHCSA_Pass</id><content type="html" xml:base="https://joshis1.github.io/em_technical_spine/2026/07/12/RHCSA_Pass.html"><![CDATA[<p>This article is for anyone preparing for the <strong>Red Hat Certified System Administrator (RHCSA)</strong> exam.</p>

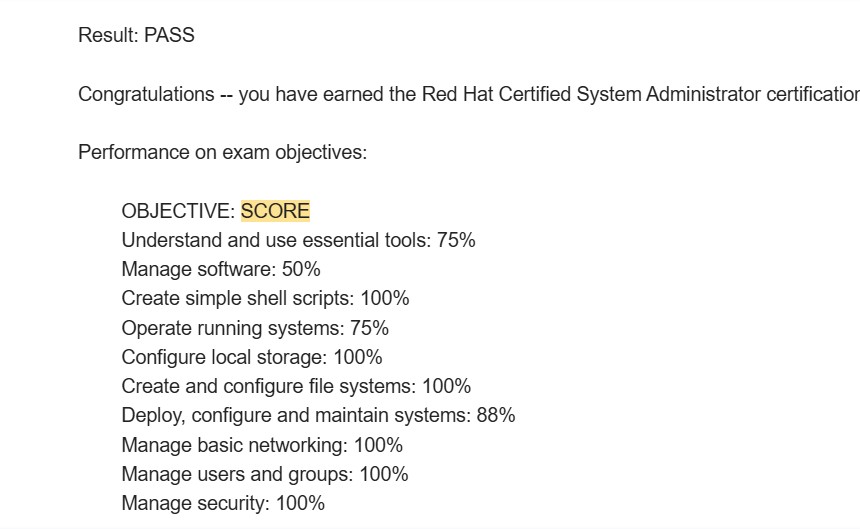
<p>I recently passed the RHCSA exam on RHEL 10. Although I already had significant Linux experience as a developer—particularly in embedded Linux, kernel development and system programming—the RHCSA preparation still taught me many valuable system administration concepts.</p>

<p>I currently work in a leadership role where I no longer write code regularly and do not have access to a Linux environment as part of my daily work. Despite that, I was able to prepare for and pass this practical exam.</p>

<p>In this article, I will explain the approach that worked for me and share the most important lessons I learned.</p>

<p><strong>Create a RHEL practice environment</strong></p>

<p>Many candidates practise using Rocky Linux, AlmaLinux or another distribution compatible with Red Hat Enterprise Linux. These distributions can be useful, but I strongly recommend creating a <a href="https://developers.redhat.com/register">Red Hat Developer account</a> and downloading RHEL directly.</p>

<p>I took the RHEL 10 version of the RHCSA exam, so practising on RHEL 10 helped me become familiar with the same operating system family used in the exam.</p>

<p>Always check the current <a href="https://www.redhat.com/en/services/training/ex200-red-hat-certified-system-administrator-rhcsa-exam">RHCSA EX200 exam objectives</a> before finalising your preparation plan, because objectives and exam versions can change.</p>

<p><strong>Virtual machine setup</strong></p>

<p>I used VMware to create my virtual machines. My personal preference is VMware over Oracle VirtualBox because I find its guest integration, snapshot management and other virtual machine features more convenient.</p>

<p>To download VMware, create a Broadcom account and use the relevant VMware download section in the <a href="https://support.broadcom.com/">Broadcom Support Portal</a>.</p>

<p>Once you have installed and configured a clean RHEL system, create a snapshot of that pristine installation. You can then experiment freely and revert to the clean state whenever necessary.</p>

<p>This can save a considerable amount of preparation time.</p>

<p><strong>Understand patterns instead of memorising commands</strong></p>

<p>The most important lesson from my preparation is this:</p>

<p><strong>Do not try to memorise every command. Understand the pattern, structure and purpose behind it.</strong></p>

<p>For every topic, ask yourself:</p>

<ol>
  <li>What problem does this command solve?</li>
  <li>What is the basic command structure?</li>
  <li>Which parts change depending on the task?</li>
  <li>How can I verify that the command worked?</li>
  <li>Will the configuration remain after a reboot?</li>
</ol>

<p>For example, when working with systemd, inspect existing service and timer definitions.</p>

<figure class="highlight"><pre><code class="language-bash" data-lang="bash">systemctl <span class="nb">cat </span>sshd.service
systemctl <span class="nb">cat </span>systemd-tmpfiles-clean.timer</code></pre></figure>

<p>Existing unit files provide useful examples of the correct structure. You can study these examples and adapt the same pattern when creating a service or timer for an exam task.</p>

<p>The objective is not to memorise an entire configuration file. It is to recognise its structure and understand which sections and values are required.</p>

<p><strong>Learn to navigate man pages efficiently</strong></p>

<p>The RHCSA exam is practical, so knowing how to find information quickly is extremely important.</p>

<p>You should become comfortable navigating Linux man pages rather than depending entirely on memory.</p>

<p>For example:</p>

<ol>
  <li>Section 8 normally contains system administration commands.</li>
  <li>Section 5 normally contains file formats and configuration-file syntax.</li>
  <li>Section 7 contains conventions, protocols and broader documentation.</li>
</ol>

<figure class="highlight"><pre><code class="language-bash" data-lang="bash">man 8 useradd
man 5 fstab
man 5 systemd.service</code></pre></figure>

<p>For NetworkManager and <code class="language-plaintext highlighter-rouge">nmcli</code>, explore the available documentation and examples.</p>

<figure class="highlight"><pre><code class="language-bash" data-lang="bash">man nmcli
man 7 nmcli-examples</code></pre></figure>

<p>The exact documentation available can vary between versions. Use <code class="language-plaintext highlighter-rouge">man -k</code> to discover related pages.</p>

<figure class="highlight"><pre><code class="language-bash" data-lang="bash">man <span class="nt">-k</span> nmcli</code></pre></figure>

<p>Learning how to search the documentation is often more valuable than memorising dozens of command variations.</p>

<p><strong>Use examples already available on the system</strong></p>

<p>RHEL contains many useful examples, default configuration files and existing systemd units. Use them.</p>

<p>When asked to create or modify something, first check whether the system already contains a similar example. You can then reproduce the pattern and adjust it for the task.</p>

<p>Useful techniques include:</p>

<figure class="highlight"><pre><code class="language-bash" data-lang="bash">systemctl <span class="nb">cat </span>sshd.service
man <span class="nt">-k</span> systemd
rpm <span class="nt">-qd</span> bash
<span class="nb">ls</span> /usr/share/doc/</code></pre></figure>

<p>The main idea is to use the resources built into the operating system. The exam is not only testing whether you remember commands. It is also testing whether you can operate as a practical Linux administrator.</p>

<p><strong>Recognise simple command patterns</strong></p>

<p>Many Linux commands become easier when you understand their basic pattern.</p>

<p>For example, an AWK rule commonly follows this structure:</p>

<figure class="highlight"><pre><code class="language-text" data-lang="text">pattern { action }</code></pre></figure>

<p>A simple example is:</p>

<figure class="highlight"><pre><code class="language-bash" data-lang="bash"><span class="nb">awk</span> <span class="s1">'$3 &gt; 1000 { print $1 }'</span> /etc/passwd</code></pre></figure>

<p>In this example:</p>

<ol>
  <li><code class="language-plaintext highlighter-rouge">$3 &gt; 1000</code> is the pattern or condition.</li>
  <li><code class="language-plaintext highlighter-rouge">{ print $1 }</code> is the action.</li>
</ol>

<p>Once you understand this structure, you can adapt it to many different tasks.</p>

<p>The same principle applies to commands such as <code class="language-plaintext highlighter-rouge">find</code>, <code class="language-plaintext highlighter-rouge">grep</code>, <code class="language-plaintext highlighter-rouge">sed</code>, <code class="language-plaintext highlighter-rouge">tar</code>, <code class="language-plaintext highlighter-rouge">chmod</code> and <code class="language-plaintext highlighter-rouge">nmcli</code>. Instead of memorising every possible command, understand the building blocks.</p>

<p>When you start seeing patterns everywhere, Linux administration becomes much easier.</p>

<p><strong>Understand LVM as a structure</strong></p>

<p>Logical Volume Management was relatively new to me, but it became much easier once I understood the structure behind it.</p>

<p>The simplified LVM hierarchy is:</p>

<figure class="highlight"><pre><code class="language-text" data-lang="text">Disk or partition
        |
        v
Physical Volume (PV)
        |
        v
Volume Group (VG)
        |
        v
Logical Volume (LV)
        |
        v
Filesystem
        |
        v
Mount point</code></pre></figure>

<p>The major components are:</p>

<ol>
  <li><strong>Physical Volume (PV):</strong> A disk or partition prepared for use by LVM.</li>
  <li><strong>Volume Group (VG):</strong> A storage pool created using one or more physical volumes.</li>
  <li><strong>Logical Volume (LV):</strong> A flexible virtual storage volume created from the volume group.</li>
  <li><strong>Filesystem:</strong> The filesystem created on the logical volume, such as XFS or ext4.</li>
  <li><strong>Mount point:</strong> The directory where the filesystem becomes accessible.</li>
</ol>

<p>Each LVM physical volume is divided into fixed-size <strong>physical extents</strong>. A logical volume consists of <strong>logical extents</strong> that are mapped to those physical extents.</p>

<p>LVM provides flexible storage allocation. For example, after a virtual disk has been enlarged in a cloud or virtualised environment, LVM can help make the additional capacity available to a logical volume and its filesystem.</p>

<p>However, LVM does not independently increase the size of the underlying physical or virtual disk.</p>

<p>A typical storage-extension flow may look like this:</p>

<figure class="highlight"><pre><code class="language-text" data-lang="text">Enlarge the physical or virtual disk
        |
        v
Enlarge the partition or physical volume, if required
        |
        v
Make the space available to the volume group
        |
        v
Extend the logical volume
        |
        v
Grow the filesystem</code></pre></figure>

<p>Conceptually, you must extend the logical volume and then grow the filesystem. The <code class="language-plaintext highlighter-rouge">-r</code> option of <code class="language-plaintext highlighter-rouge">lvextend</code> can perform both operations together when the filesystem is supported.</p>

<figure class="highlight"><pre><code class="language-bash" data-lang="bash">lvextend <span class="nt">-r</span> <span class="nt">-L</span> +1G /dev/vg_data/lv_data</code></pre></figure>

<p>Commands such as <code class="language-plaintext highlighter-rouge">pvs</code>, <code class="language-plaintext highlighter-rouge">vgs</code>, <code class="language-plaintext highlighter-rouge">lvs</code>, <code class="language-plaintext highlighter-rouge">lvextend</code>, <code class="language-plaintext highlighter-rouge">xfs_growfs</code> and <code class="language-plaintext highlighter-rouge">resize2fs</code> become easier to remember when you understand where each command fits within this structure.</p>

<p><strong>Practise verification after every task</strong></p>

<p>Completing a command is not enough. You should always verify the result.</p>

<p>For example:</p>

<ol>
  <li>After creating a user, use <code class="language-plaintext highlighter-rouge">id</code> or inspect <code class="language-plaintext highlighter-rouge">/etc/passwd</code>.</li>
  <li>After configuring a service, use <code class="language-plaintext highlighter-rouge">systemctl status</code> and <code class="language-plaintext highlighter-rouge">systemctl is-enabled</code>.</li>
  <li>After modifying a firewall rule, inspect the active configuration.</li>
  <li>After creating a mount, use <code class="language-plaintext highlighter-rouge">findmnt</code>, <code class="language-plaintext highlighter-rouge">lsblk</code> or <code class="language-plaintext highlighter-rouge">df</code>.</li>
  <li>After configuring networking, use <code class="language-plaintext highlighter-rouge">nmcli</code>, <code class="language-plaintext highlighter-rouge">ip address</code> and an appropriate connectivity test.</li>
  <li>After creating a logical volume, use <code class="language-plaintext highlighter-rouge">pvs</code>, <code class="language-plaintext highlighter-rouge">vgs</code>, <code class="language-plaintext highlighter-rouge">lvs</code> and <code class="language-plaintext highlighter-rouge">lsblk</code>.</li>
</ol>

<p>Build the following habit:</p>

<figure class="highlight"><pre><code class="language-text" data-lang="text">Perform the task -&gt; Verify the task -&gt; Confirm persistence</code></pre></figure>

<p>Persistence is especially important. A configuration that works now but disappears after reboot may not satisfy the exam requirement.</p>

<p><strong>Practise under time pressure</strong></p>

<p>The RHCSA exam is not extremely difficult conceptually, but it is also not a simple exam.</p>

<p>The main challenge is completing multiple practical tasks within a limited period. Unlike a multiple-choice exam, you must configure a real system and make sure that your work is correct and persistent.</p>

<p>During preparation, practise complete task sets rather than practising only individual commands.</p>

<p>Your task sets may include topics such as:</p>

<ol>
  <li>Users and groups</li>
  <li>Permissions and ACLs</li>
  <li>Storage and LVM</li>
  <li>Filesystems and persistent mounts</li>
  <li>Networking</li>
  <li>SELinux</li>
  <li>Firewalld</li>
  <li>Systemd services and timers</li>
  <li>Package management</li>
  <li>Scheduled tasks</li>
  <li>File searching and text processing</li>
  <li>Simple shell scripting</li>
</ol>

<p>Always align your final topic list with the official objectives for the version of the exam you have scheduled.</p>

<p>Completing full practice sets within a fixed period helps improve your technical knowledge, speed, confidence, troubleshooting ability and time management.</p>

<p><strong>Keep your commands simple</strong></p>

<p>During the exam, use the simplest reliable solution.</p>

<p>Avoid creating a complicated command when a straightforward one can complete the task. Complex commands are harder to troubleshoot and easier to mistype.</p>

<p>Also avoid making unnecessary system changes. Read each task carefully, identify exactly what is being requested, complete it, verify it and move forward.</p>

<p><strong>My final thoughts</strong></p>

<p>The RHCSA exam is achievable, even for someone who is no longer working directly with Linux every day.</p>

<p>My previous Linux experience certainly helped, but the exam still required focused preparation—particularly in areas such as LVM, system administration, networking, SELinux, systemd and persistent configuration.</p>

<p>The most effective preparation strategy is not to memorise hundreds of commands. Instead:</p>

<ol>
  <li>Understand the purpose of each concept.</li>
  <li>Recognise common command and configuration patterns.</li>
  <li>Learn to use man pages and built-in examples.</li>
  <li>Practise every task directly on RHEL.</li>
  <li>Verify every configuration.</li>
  <li>Repeat complete exercises under time pressure.</li>
</ol>

<p>Once you understand the structures and patterns behind Linux administration, the RHCSA exam becomes much more manageable.</p>

<p><img src="/assets/img/RHCSA_Exam_Results.jpg" alt="RHCSA_Passed_RHEL10" /></p>

<p>The exam is practical, and your preparation should be practical too.</p>]]></content><author><name>Shreyas Joshi</name></author><category term="EM_Technical_Spine" /><summary type="html"><![CDATA[A practical RHCSA preparation approach focused on RHEL practice, documentation, verification, and timed exercises.]]></summary></entry><entry><title type="html">Adding Packages to a Yocto Image</title><link href="https://joshis1.github.io/embedded_linux/2020/04/03/Zedboard_Yocto_Install_Packages.html" rel="alternate" type="text/html" title="Adding Packages to a Yocto Image" /><published>2020-04-03T05:13:31+00:00</published><updated>2020-04-03T05:13:31+00:00</updated><id>https://joshis1.github.io/embedded_linux/2020/04/03/Zedboard_Yocto_Install_Packages</id><content type="html" xml:base="https://joshis1.github.io/embedded_linux/2020/04/03/Zedboard_Yocto_Install_Packages.html"><![CDATA[<p>This short, historical note shows how I added packages to a Yocto image. Recipe names and override syntax vary by Yocto release; this example is from the Warrior-era setup.
For e.g, I would like to add curl and node js package in Yocto.</p>

<p><strong>Check whether those packages are already available or not</strong>
The best thing is to check whether those packages already exist or not.
For e.g. run the command bitbake-layers show-recipes and redirect its output to a file.
Next, open your favourite editor and find the package. There is a good chance it is already
available and its the matter of compiling and installing that package to your root file system.</p>

<figure class="highlight"><pre><code class="language-text" data-lang="text">$bitbake-layers show-recipes  &gt; recipes.txt</code></pre></figure>

<p>Also, you can check using the following link -</p>

<p><a href="http://layers.openembedded.org/layerindex/branch/warrior/layers/?">packages</a></p>

<p><strong>How to add those packages to your root file system</strong></p>

<p>First define in local.conf file what packages you would like to install.</p>

<figure class="highlight"><pre><code class="language-text" data-lang="text"> 
 WEB_PACKAGES = " \
  curl \
  nodejs \
"</code></pre></figure>

<p>Next append those packages.</p>

<figure class="highlight"><pre><code class="language-text" data-lang="text">IMAGE_INSTALL_append = " ${WEB_PACKAGES}"</code></pre></figure>

<p>Now, build your image again.</p>

<figure class="highlight"><pre><code class="language-text" data-lang="text">$bitbake core-image-minimal</code></pre></figure>

<p>Now, your root file system should have those packages - nodejs and curl.</p>

<p>This brings an end to this article.</p>]]></content><author><name>Shreyas Joshi</name></author><category term="Embedded_Linux" /><summary type="html"><![CDATA[A short, version-specific note on finding recipes and adding packages to a Yocto image.]]></summary></entry><entry><title type="html">Reading and Writing QSPI Flash with U-Boot on Zynq</title><link href="https://joshis1.github.io/embedded_linux/2020/04/03/Zedboard_QSPI_Uboot.html" rel="alternate" type="text/html" title="Reading and Writing QSPI Flash with U-Boot on Zynq" /><published>2020-04-03T01:13:31+00:00</published><updated>2020-04-03T01:13:31+00:00</updated><id>https://joshis1.github.io/embedded_linux/2020/04/03/Zedboard_QSPI_Uboot</id><content type="html" xml:base="https://joshis1.github.io/embedded_linux/2020/04/03/Zedboard_QSPI_Uboot.html"><![CDATA[<p>This historical walkthrough records how I loaded a kernel and device tree from an SD card, wrote them to QSPI NOR flash with U-Boot, read them back for verification, and booted the kernel on a Zynq board. Confirm flash offsets, image sizes, and memory addresses for your hardware before running any write or erase command.</p>

<p><strong>What is the DRAM memory size?</strong>
In order to find the DRAM memory size in uboot, we can run the following command.</p>

<figure class="highlight"><pre><code class="language-text" data-lang="text">Zynq&gt; bdinfo
arch_number = 0x00000000
boot_params = 0x00000000
DRAM bank   = 0x00000000
-&gt; start    = 0x00000000
-&gt; size     = 0x40000000
baudrate    = 115200 bps
TLB addr    = 0x3fff0000
relocaddr   = 0x3ff51000
reloc off   = 0x3bf51000
irq_sp      = 0x3eb2de10
sp start    = 0x3eb2de00
ARM frequency = 666 MHz
DSP frequency = 0 MHz
DDR frequency = 533 MHz
Early malloc usage: 5cc / 600
fdt_blob    = 0x3eb2de28</code></pre></figure>

<p>we can see that the size is 0x40000000 in hexadecimal.</p>

<p><strong>How do I convert the hexadecimal to memory size?</strong>
Here given number is 0x4 0000000 i.e 0x4 and 7 zeroes.
So, hexadecimal is nothing but 4 bits representation or nibble you can say.
In our example, we have 7 zeroes or we can say it has 7*4 = 28 bits zero.
Now, 0x4 is nothing but 2^2. Thus, in total it is 2^2 * 2^28 = 2^30.
Now, 2^10 is kilobytes, 2^20 is Megabytes, 2^30 is 1 Gigabytes.
So, we have 1 Gigabytes RAM.</p>

<p><strong>List the directory contents of the SD card formatted in FAT</strong></p>

<figure class="highlight"><pre><code class="language-text" data-lang="text">Zynq&gt; fatls mmc 0
            System Volume Information/
    84104   boot.bin
  2083852   custom_ip.bit
   548898   u-boot.img
      957   uEnv.txt
  4162656   uImage
    11893   devicetree.dtb
            .Spotlight-V100/
            .fseventsd/

7 file(s), 3 dir(s)</code></pre></figure>

<p><strong>How to flash uImage to QSPI?</strong></p>

<p>The first thing here is to read the uImage from the FAT partition of sd card and load that image
into memory. In this example, we are loading the uImage i.e. kernel image from mmc 0 and storing the
uImage at memory address - 0x3000000 i.e 0x3 and 6 zeroes. 
The 6 zeroes is nothing but 6*4 = 24 bits or 2^24 and 0x3.
Next, we know that 2^20 is 1 Mb, so it is 2^4 * 0x3 = 48Mb. So, we are placing the UImage at the offset of 48Mbytes
in DRAM.</p>

<figure class="highlight"><pre><code class="language-text" data-lang="text">fatload mmc 0 0x3000000 ${kernel_image}</code></pre></figure>

<p>Now, flash the QSPI NOR</p>

<p>Probe the SPI Nor.</p>

<figure class="highlight"><pre><code class="language-text" data-lang="text">Zynq&gt;  sf probe 0 0 0
SF: Detected s25fl128s_64k with page size 256 Bytes, erase size 64 KiB, total 16 MiB</code></pre></figure>

<p>We cannot directly onto QSPI Nor flash, first we need to erase the block and then only we can write the
data. So, let’s first erase 8Mb for kernel image. I know this pretty big. In theory, my zedboard kernel image size is just a little over 4 Mb. So, 8 Mb is pretty safe.</p>

<figure class="highlight"><pre><code class="language-text" data-lang="text">sf erase 0 0x800000  //Erase 8MB from QSPI offset 0x0</code></pre></figure>

<p>Write the uImage i.e. kernel image to the QSPI.</p>

<figure class="highlight"><pre><code class="language-text" data-lang="text">sf write 0x3000000 0 0x800000  //written to QSPI offset 0 and read from RAM memory 0x3000000</code></pre></figure>

<p>Now, let’s readback the uImage from SPI NOR and store that uImage onto memory location - 
0x8000000 i.e. 0x8 and 6 zeroes. i.e. 2^3 and 6*4 = 24 or 2^24. This means 2^27 or 2^7 *2^20 = 128Mb.
So, now we are reading the uImage from QSPI and store at the memory location - 128Mb from the base address i.e 0x000.</p>

<figure class="highlight"><pre><code class="language-text" data-lang="text">sf read  0x8000000 0  0x800000  // read back into memory 0x8000000  -- kernel image read</code></pre></figure>

<p>Now, check wether the uImage is there in the memory address 0x8000000 or not.</p>

<figure class="highlight"><pre><code class="language-text" data-lang="text">Zynq&gt; md 0x8000000
00010000: 56190527 a7f99ceb 64ad585e 20843f00    '..V....^X.d.?.
00010010: 00800000 00800000 d52ee395 00020205    ................
00010020: 756e694c 2e342d78 302e3931 6c69782d    Linux-4.19.0-xil
00010030: 2d786e69 31303276 00312e39 00000000    inx-v2019.1.....
00010040: e1a00000 e1a00000 e1a00000 e1a00000    ................
00010050: e1a00000 e1a00000 e1a00000 e1a00000    ................
00010060: ea000005 016f2818 00000000 003f8420    .....(o..... .?.
00010070: 04030201 45454545 00003460 e10f9000    ....EEEE`4......
00010080: eb000bf6 e1a07001 e1a08002 e10f2000    .....p....... ..
00010090: e3120003 1a000001 e3a00017 ef123456    ............V4..
000100a0: e10f0000 e220001a e310001f e3c0001f    ...... .........
000100b0: e38000d3 1a000004 e3800c01 e28fe00c    ................
000100c0: e16ff000 e12ef30e e160006e e121f000    ..o.....n.`...!.
000100d0: e16ff009 00000000 00000000 00000000    ..o.............
000100e0: e1a0400f e204433e e2844902 e1a0000f    .@..&gt;C...I......
000100f0: e1500004 359f01b0 3080000f 31540000    ..P....5...0..T1</code></pre></figure>

<p>Similarly, read the device tree.</p>

<p><strong>Load device tree from FAT</strong></p>

<figure class="highlight"><pre><code class="language-text" data-lang="text">fatload mmc 0 0x2A00000 ${devicetree_image}</code></pre></figure>

<p><strong>Flash device tree into QSPI</strong></p>

<p>Since, we have already consumed first 8Mb from QSPI for uImage purpose, we should write the
device tree after 8Mb in QSPI. Thus, the offset should be 8Mb.</p>

<p><strong>Erase 4Mb for device tree into QSPI</strong></p>

<figure class="highlight"><pre><code class="language-text" data-lang="text">sf erase 0x800000  0x400000 //erase 4MB for Device Tree</code></pre></figure>

<p><strong>Flash/write device tree into QSPI</strong></p>

<figure class="highlight"><pre><code class="language-text" data-lang="text">sf write 0x2A00000 0x800000  0x400000  //written to QSPI from RAM memory 0x2A00000</code></pre></figure>

<p><strong>Readback device tree from QSPI into different memory location</strong></p>

<p>Previously, we have read uImage into memory space - 128Mb and as I know my kernel size is not more than 5Mb.
Thus, any memory address 128Mb + 5Mb = 133Mb should be fine. Here, I have taken the memory address - 
140Mb. Thus, 140 Mb is nothing 0x8C and 5 zeroes. The 0x8C equals to 140 in decimal.</p>

<p><strong>Flash/write device tree into QSPI</strong></p>

<figure class="highlight"><pre><code class="language-text" data-lang="text">sf read  0x8C00000 0x800000 0x400000 //device tree read from QSPI offset 0x800000 and how much to read i.e. 0x400000 ~ 4Mb read.</code></pre></figure>

<p><strong>Verify the device tree image using memory dump</strong></p>

<figure class="highlight"><pre><code class="language-text" data-lang="text">Zynq&gt; md 0x8C00000
00180000: edfe0dd0 752e0000 38000000 302a0000    .......u...8..*0
00180010: 28000000 11000000 10000000 00000000    ...(............
00180020: 45040000 f8290000 00000000 00000000    ...E..).........
00180030: 00000000 00000000 01000000 00000000    ................
00180040: 03000000 04000000 00000000 01000000    ................
00180050: 03000000 04000000 0f000000 01000000    ................
00180060: 03000000 36000000 1b000000 656e7661    .......6....avne
00180070: 797a2c74 6d2d716e 6f726369 0064657a    t,zynq-microzed.
00180080: 786e6c78 6e797a2c 696d2d71 7a6f7263    xlnx,zynq-microz
00180090: 78006465 2c786e6c 716e797a 3030372d    ed.xlnx,zynq-700
001800a0: 00000030 03000000 15000000 26000000    0..............&amp;
001800b0: 656e7641 694d2074 5a6f7263 62206465    Avnet MicroZed b
001800c0: 6472616f 00000000 01000000 73757063    oard........cpus
001800d0: 00000000 03000000 04000000 00000000    ................
001800e0: 01000000 03000000 04000000 0f000000    ................
001800f0: 00000000 01000000 40757063 00000030    ........cpu@0...</code></pre></figure>

<p><strong>Boot kernel image</strong>
The command here is bootm “uImage address”  “rootfs address if you have otherwise put -“  “device tree address”.
In my case, I don’t have rootfs address. Thus, I am putting ‘-‘.</p>

<figure class="highlight"><pre><code class="language-text" data-lang="text">bootm 0x8000000 - 0x8C00000</code></pre></figure>

<p><strong>How to run elf image using uboot</strong>
Similar to bootm, you can use bootelf to run an elf executable.
Suppose an elf is stored at the memory address 0x1000000.</p>

<figure class="highlight"><pre><code class="language-text" data-lang="text"> bootelf 0x1000000</code></pre></figure>

<p>This brings an end to this article.</p>]]></content><author><name>Shreyas Joshi</name></author><category term="Embedded_Linux" /><summary type="html"><![CDATA[A historical Zynq U-Boot walkthrough for loading, writing, verifying, and booting kernel and device-tree images from QSPI.]]></summary></entry><entry><title type="html">Byte Order (Endianness): Big-Endian vs Little-Endian</title><link href="https://joshis1.github.io/computer_science_concepts/2020/04/02/Endianity.html" rel="alternate" type="text/html" title="Byte Order (Endianness): Big-Endian vs Little-Endian" /><published>2020-04-02T01:13:31+00:00</published><updated>2020-04-02T01:13:31+00:00</updated><id>https://joshis1.github.io/computer_science_concepts/2020/04/02/Endianity</id><content type="html" xml:base="https://joshis1.github.io/computer_science_concepts/2020/04/02/Endianity.html"><![CDATA[<p>Endianness describes the order in which the bytes of a multi-byte value are stored in memory. It does not change the value itself; it describes how that value is represented across byte addresses.</p>

<h2 id="big-endian-and-little-endian">Big-endian and little-endian</h2>

<p>Consider the 32-bit value <code class="language-plaintext highlighter-rouge">0x12345678</code>. If its first byte is stored at the lowest address:</p>

<table>
  <thead>
    <tr>
      <th>Byte address order</th>
      <th>Bytes stored</th>
    </tr>
  </thead>
  <tbody>
    <tr>
      <td>Big-endian</td>
      <td><code class="language-plaintext highlighter-rouge">12 34 56 78</code></td>
    </tr>
    <tr>
      <td>Little-endian</td>
      <td><code class="language-plaintext highlighter-rouge">78 56 34 12</code></td>
    </tr>
  </tbody>
</table>

<p>Big-endian stores the most significant byte at the lowest address. Little-endian stores the least significant byte there. Endianness applies to values made of multiple bytes; a single byte has no byte order.</p>

<p>Neither format is inherently more natural or universally faster. Processor architecture, instruction set, and workload determine performance. The byte order used to store an integer is separate from the way arithmetic is performed on that integer.</p>

<h2 id="why-byte-order-matters">Why byte order matters</h2>

<p>Programs that exchange binary data need an agreed representation. If a sender and receiver interpret the same bytes using different byte orders, a multi-byte value can be decoded incorrectly. Text formats and protocols that define individual bytes avoid some ambiguity, but binary formats must specify field width, byte order, and often signedness as well.</p>

<p>Internet protocols commonly use <strong>network byte order</strong>, which is big-endian for multi-byte integer fields. In C, <code class="language-plaintext highlighter-rouge">htons</code> and <code class="language-plaintext highlighter-rouge">htonl</code> convert 16-bit and 32-bit values from host byte order to network byte order; <code class="language-plaintext highlighter-rouge">ntohs</code> and <code class="language-plaintext highlighter-rouge">ntohl</code> convert them back. These functions convert representation when needed and are effectively no-ops on hosts that already use network byte order. They do not convert an IP address string into an address; use the appropriate address-parsing API for that.</p>

<p>For portable file formats and network messages, prefer documented serialization APIs over copying a native integer’s in-memory bytes. That makes the representation explicit and avoids assumptions about the machine running the code.</p>]]></content><author><name>Shreyas Joshi</name></author><category term="Computer_Science_Concepts" /><summary type="html"><![CDATA[A practical explanation of byte order, how it affects multi-byte values, and why network protocols specify an encoding.]]></summary></entry><entry><title type="html">Debugging Linux Device Tree Overlays on MicroZed</title><link href="https://joshis1.github.io/embedded_linux/2020/04/01/Linux-Device-tree-overlay.html" rel="alternate" type="text/html" title="Debugging Linux Device Tree Overlays on MicroZed" /><published>2020-04-01T03:13:31+00:00</published><updated>2020-04-01T03:13:31+00:00</updated><id>https://joshis1.github.io/embedded_linux/2020/04/01/Linux-Device-tree-overlay</id><content type="html" xml:base="https://joshis1.github.io/embedded_linux/2020/04/01/Linux-Device-tree-overlay.html"><![CDATA[<p>This historical walkthrough records how I debugged a device tree overlay for an out-of-tree PHY driver on a Yocto-built MicroZed system. Kernel, compiler, and board details affect the exact steps, so check the corresponding versions before applying them elsewhere.</p>

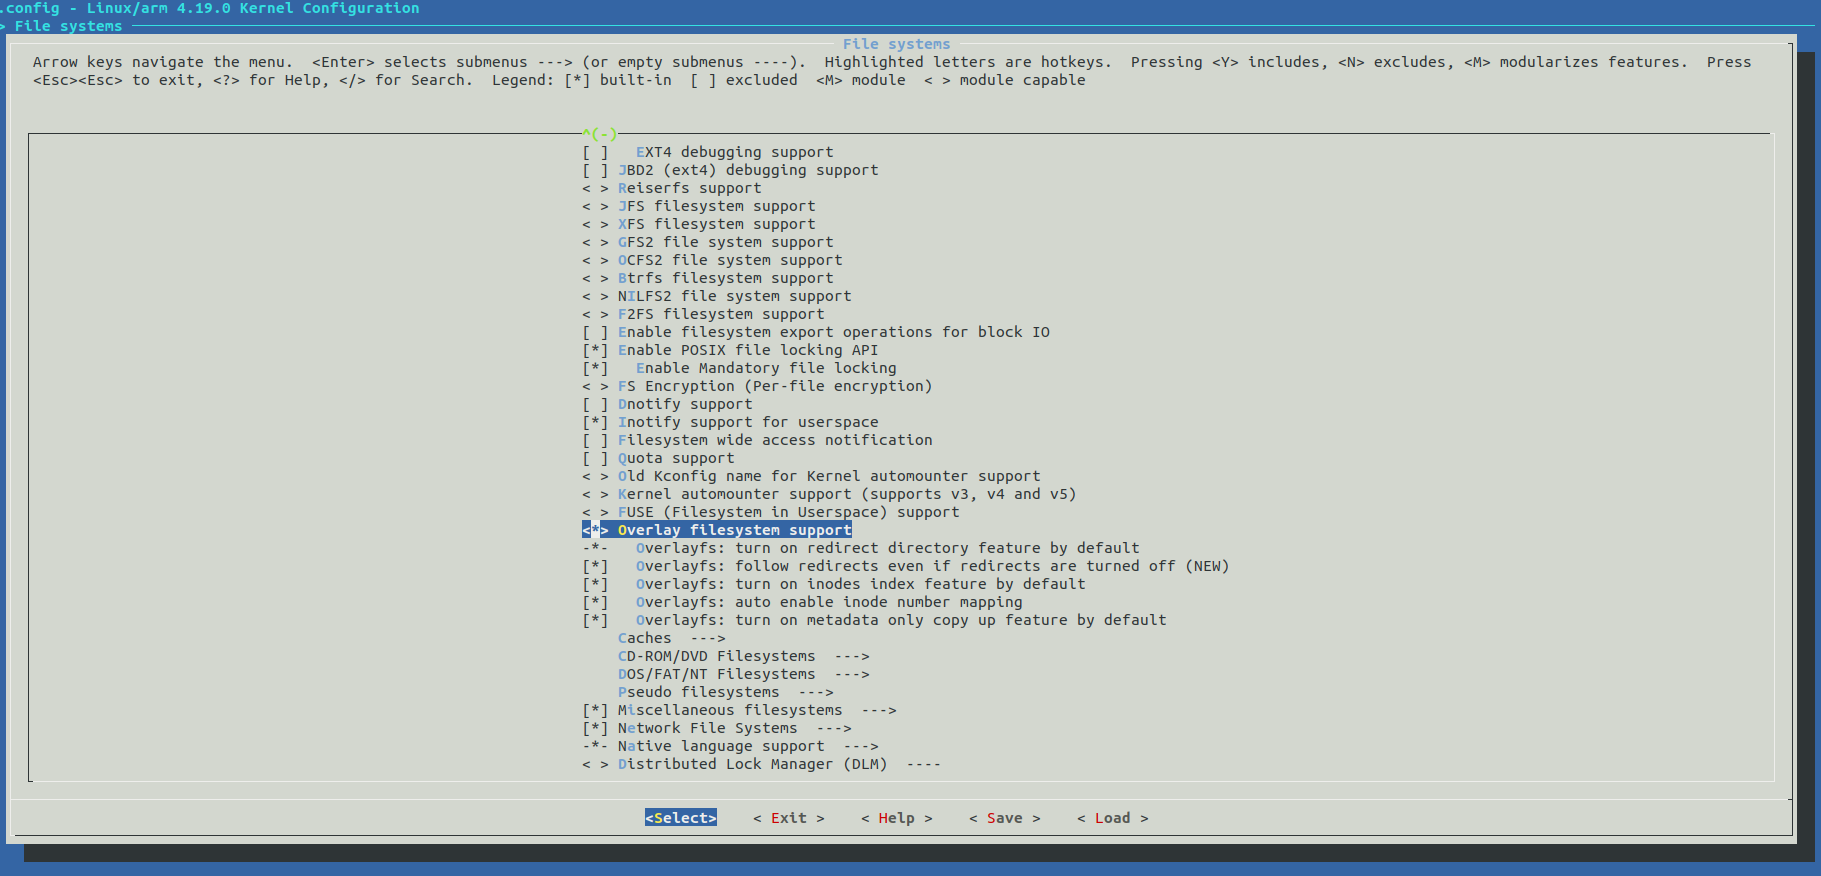
<figure class="highlight"><pre><code class="language-text" data-lang="text">#/sys/kernel/config/device-tree/overlays/</code></pre></figure>

<p><img src="/assets/img/Overlay_config.png" alt="Device Tree Overlay" /></p>

<h2 id="compile-a-dts-file-into-a-dtbo">Compile a DTS file into a DTBO</h2>

<p>If you have an SDK from yocto, then it is pretty easy. This is how I do.
Here, the output is phyDriver.dtbo and the input is phyDriver.dts. 
Remember, you need to use -@ DTC flag so that it can use the existing symbol from the device tree.</p>

<figure class="highlight"><pre><code class="language-text" data-lang="text">dtc -I dts -O dtb -o phyDriver.dtbo -@ ./phyDriver.dts</code></pre></figure>

<h2 id="load-the-dtbo-file">Load the DTBO file</h2>
<p>First, create a directory inside the overlays i.e.  /sys/kernel/config/device-tree/overlays.
Afterwards, copy the contents of the phyDriver.dtbo to the dtbo file there.
For e.g., copy the contents of phyDriver.dtbo to the /sys/kernel/config/device-tree/overlays/phyDriver/dtbo.
Here is what I am doing here.</p>

<figure class="highlight"><pre><code class="language-text" data-lang="text">root@microzed-zynq7:~# mkdir -p /sys/kernel/config/device-tree/overlays/phyDriver
root@microzed-zynq7:~# cat /home/root/phyDriver.dtbo  &gt; /sys/kernel/config/device-tree/overlays/phyDriver/dtbo</code></pre></figure>

<p><strong>Problems I faced</strong></p>

<p>Here was my first DTS file.</p>

<figure class="highlight"><pre><code class="language-text" data-lang="text">/dts-v1/;
/plugin/;

/ {
fragment@1 {
	__overlay__ {
	#address-cells = &lt;0x1&gt;;
	#size-cells = &lt;0x1&gt;;
	custom_port_phy {
	#address-cells = &lt;1&gt;;
	#size-cells = &lt;0&gt;;
	compatible = "custom,custom-port-phy";
	Dummy_Port_Phy0: dummy_port_phy@0 {
	  			       reg = &lt;0&gt;;
				       speed = &lt;1000&gt;;
				};
				Dummy_Port_Phy1: dummy_port_phy@1 {
					reg = &lt;1&gt;;
					speed = &lt;1000&gt;;
				};
			};
		};
	};
};</code></pre></figure>

<p>When I loaded the DTBO file, I got the following error.</p>

<figure class="highlight"><pre><code class="language-text" data-lang="text">root@microzed-zynq7:~# mkdir -p /sys/kernel/config/device-tree/overlays/phyDriver
root@microzed-zynq7:~# cat /home/root/phyDriver.dtbo  &gt; /sys/kernel/config/device-tree/overlays/phyDriver/dtbo
OF: overlay: find target, node: /fragment@1, no target property
OF: overlay: init_overlay_changeset() failed, ret = -22
create_overlay: Failed to create overlay (err=-22)ss</code></pre></figure>

<p><strong>How did I fix this</strong></p>

<p>This was pretty easy to fix since it was complaining very loudly that I am missing target property.
So, I checked a couple of examples and I decided that I need to provide a target property there.
Here was my revised DTS file.</p>

<figure class="highlight"><pre><code class="language-text" data-lang="text">/dts-v1/;
/plugin/;

/ {
fragment@0 {
     target = &lt;&amp;amba&gt;;
	__overlay__ {
        #address-cells = &lt;0x1&gt;;
	#size-cells = &lt;0x0&gt;;
	custom_port_phy {
        #address-cells = &lt;1&gt;;
	#size-cells = &lt;0&gt;;
	compatible = "custom,custom-port-phy";
	Dummy_Port_Phy0: dummy_port_phy@0 {
	  			       reg = &lt;0&gt;;
				       speed = &lt;1000&gt;;
				};
				Dummy_Port_Phy1: dummy_port_phy@1 {
					reg = &lt;1&gt;;
					speed = &lt;1000&gt;;
				};
			};
		};
	};
};</code></pre></figure>

<p><strong>Compile the above revised DTS file</strong>
Afterwards, I again tried compiling the device tree and then tried loading the DTBO.
However, the loading still failed with a different error. Here is what I have seen.</p>

<figure class="highlight"><pre><code class="language-text" data-lang="text">root@microzed-zynq7:~# cat /home/root/phyDriver.dtbo  &gt; /sys/kernel/config/device-tree/overlays/phyDriver/dtbo
OF: resolver: no symbols in root of device tree.
OF: resolver: overlay phandle fixup failed: -22
create_overlay: Failed to create overlay (err=-22)</code></pre></figure>

<p><strong>How to fix the above issue and what does it mean?</strong>
Again the error was loud that there are no symbols. So, I started looking onto more closely on what is meant
by symbol. One thing for sure this error has come from  target = &lt;&amp;amba&gt;;. So, I thought probably it doesn’t know
what is amba? After a lot of search, I found that the problem is that before even I loaded the DTBO, the device tree
didn’t have symbols. The DTBO relies on symbol since symbol wasn’t there the DTBO failed. So, the root cause was the
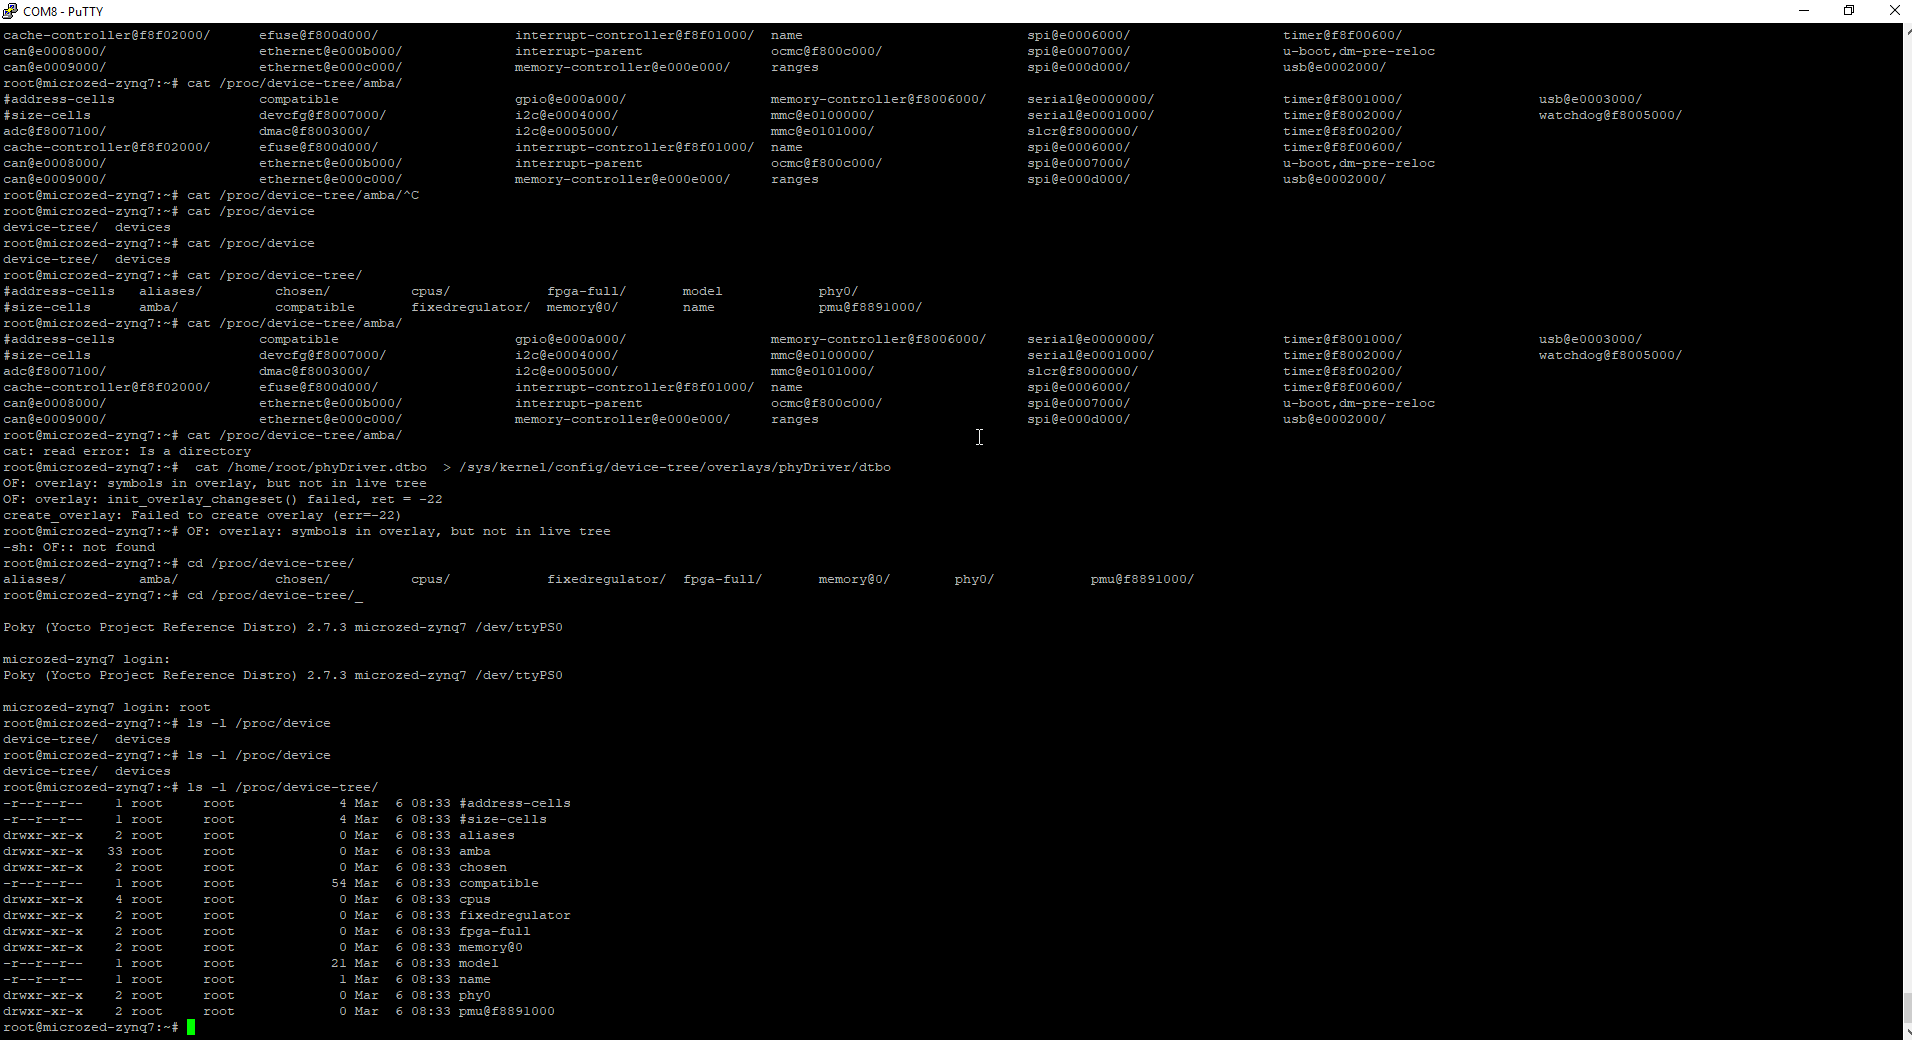
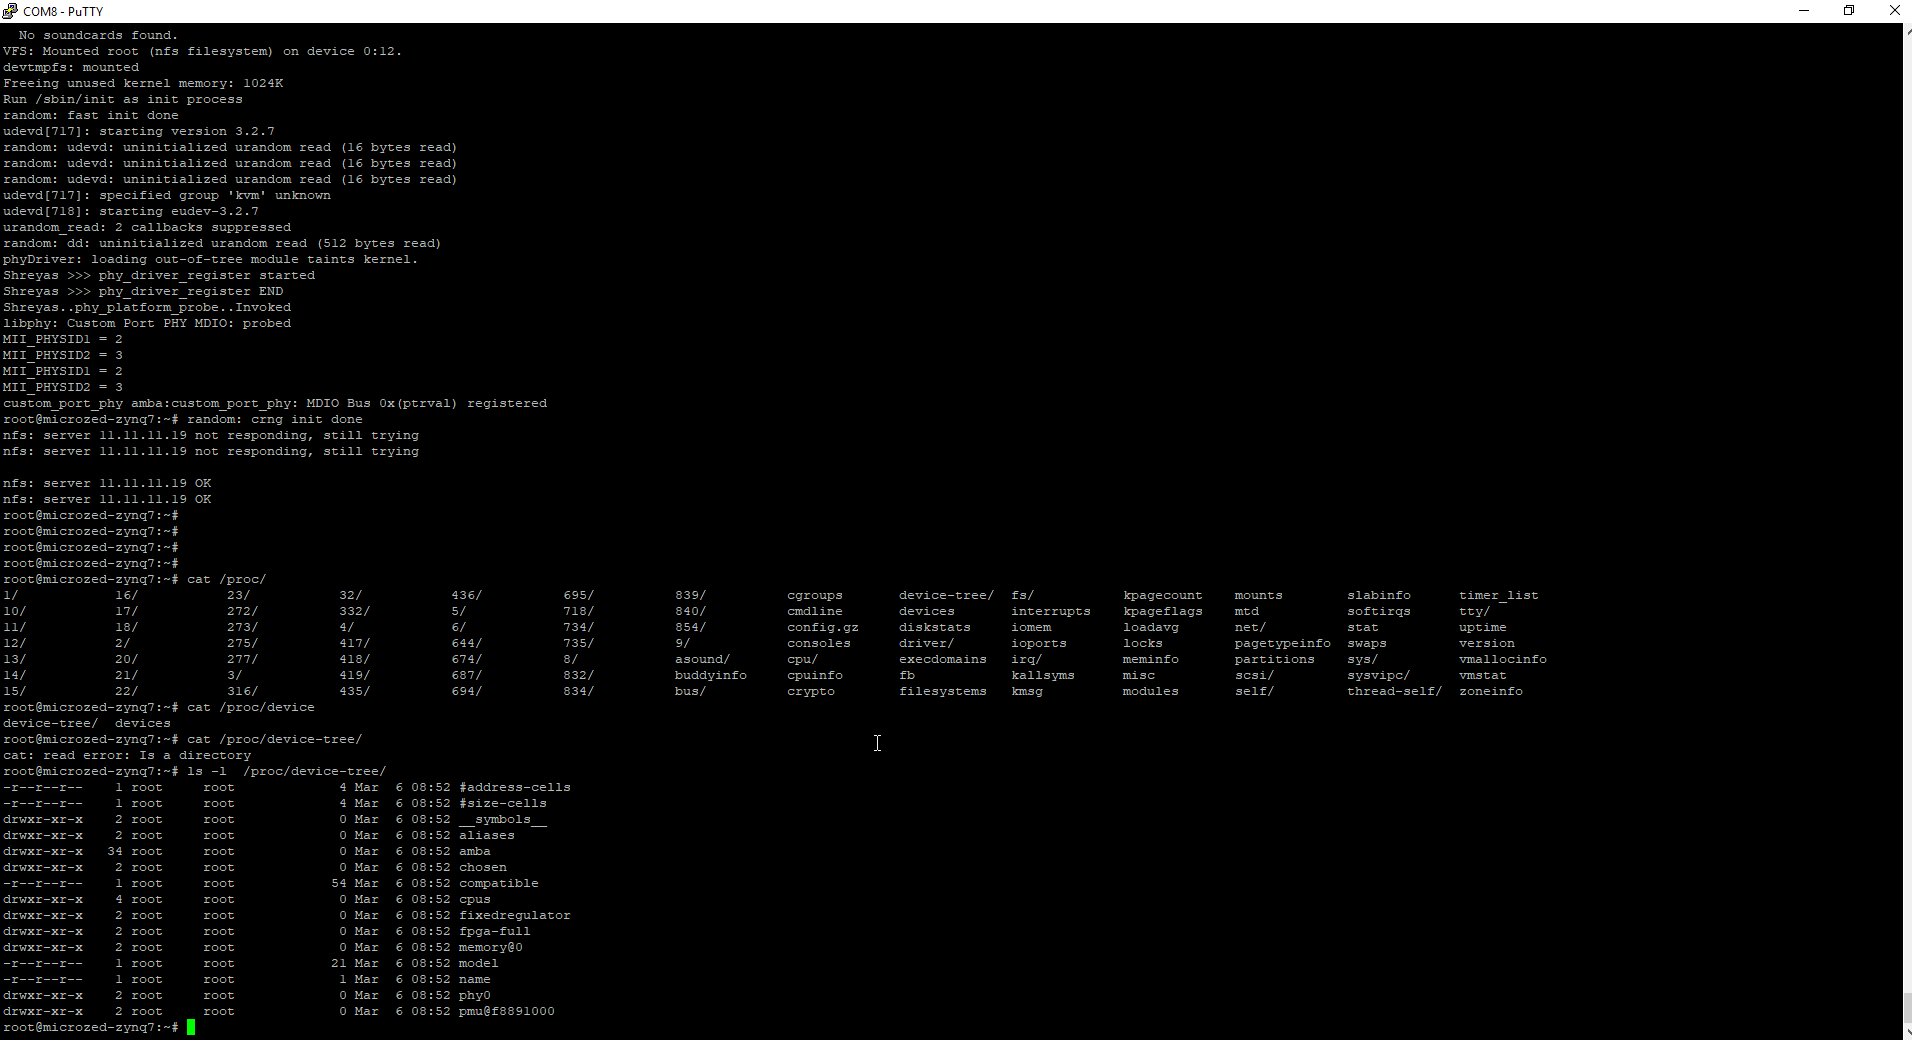
DTB file and not DTBO. Build the base device tree with the DTC <code class="language-plaintext highlighter-rouge">-@</code> flag so it exports the symbols required to resolve the overlay references. Rebuild and deploy the base DTB, then compile and load the overlay again.</p>

<p>Here is the device tree without symbol.</p>

<p><img src="/assets/img/NO_SYMBOL_DTC.png" alt="No Symbol Device Tree" /></p>

<p>After the fix, you can see that the device tree has got the symbols.</p>

<p><img src="/assets/img/SYMBOL_DTC.png" alt="Symbol Device Tree" /></p>

<p><strong>Reverse Engineering to know from where it is reading DTS file to create devicetree.dtb file</strong></p>

<figure class="highlight"><pre><code class="language-text" data-lang="text">shreyas@shreyas-VirtualBox:~/microzed/poky/build(warrior)$bitbake -e core-image-minimal| grep KERNEL_DEVICETREE
# $KERNEL_DEVICETREE
KERNEL_DEVICETREE="zynq-microzed.dtb"
    if d.getVar("KERNEL_DEVICETREE"):
        dtbs = d.getVar("KERNEL_DEVICETREE").split(" ")</code></pre></figure>

<p>since, you know the name of the dtb file i.e. zynq-microzed.dtb, you can search for this string.</p>

<figure class="highlight"><pre><code class="language-text" data-lang="text">shreyas@shreyas-VirtualBox:~/microzed/poky(warrior)$grep -ir zynq-microzed.dtb ./meta-xilinx/
./meta-xilinx/meta-xilinx-bsp/conf/machine/microzed-zynq7.conf:KERNEL_DEVICETREE = "zynq-microzed.dtb"</code></pre></figure>

<p><strong>How to compile Device Tree in Yocto</strong></p>

<figure class="highlight"><pre><code class="language-text" data-lang="text">bitbake virtual/dtb -c compile -f
bitbake virtual/kernel -f -c deploy</code></pre></figure>

<p><strong>How to add device tree flag</strong></p>

<p>In order to generate symbols in the device tree, we need to compile the device tree with the
device tree flag - “-@”. You could add this flag in the local.conf file in yocto.</p>

<figure class="highlight"><pre><code class="language-text" data-lang="text">DEVICETREE_FLAGS += "-@"</code></pre></figure>

<p><strong>How to compile device tree locally using devshell</strong>
I have tried this method and it works all the time and is most reliable way.</p>

<figure class="highlight"><pre><code class="language-text" data-lang="text">bitbake -c devshell virtual/kernel 
$DTC_FLAGS="-@" make dtbs
$cp ../../../work/microzed_zynq7-poky-linux-gnueabi/linux-xlnx/4.19-xilinx-v2019.1+gitAUTOINC+9811303824-r0/linux-microzed_zynq7-standard-build/arch/arm/boot/dts/zynq-microzed.dtb
$rm -f ../../../work/microzed_zynq7-poky-linux-gnueabi/linux-xlnx/4.19-xilinx-v2019.1+gitAUTOINC+9811303824-r0/linux-microzed_zynq7-standard-build/arch/arm/boot/dts/zynq-microzed.dtb</code></pre></figure>

<p>Now, I loaded the device tree. Afterwards, I loaded the device tree overlay.
After loading the device tree overlay, I loaded my phyDriver. This is what I saw.</p>

<figure class="highlight"><pre><code class="language-text" data-lang="text">#insmod phyDriver.ko

phyDriver: loading out-of-tree module taints kernel.
Shreyas &gt;&gt;&gt; phy_driver_register started
Shreyas &gt;&gt;&gt; phy_driver_register END
Shreyas..phy_platform_probe..Invoked
libphy: Custom Port PHY MDIO: probed
MII_PHYSID1 = 2
MII_PHYSID2 = 3
MII_PHYSID1 = 2
MII_PHYSID2 = 3
custom_port_phy amba:custom_port_phy: MDIO Bus 0x04df9772 registered</code></pre></figure>

<p><strong>Device Tree Editor</strong>
I couldn’t fina any device tree editor other then a plugin in VSCode. Here is what I have used 
to edit or write device tree.</p>

<figure class="highlight"><pre><code class="language-text" data-lang="text">https://marketplace.visualstudio.com/items?itemName=plorefice.devicetree </code></pre></figure>

<p><strong>How to build linux kernel module out of the yocto tree</strong>
This can be achieved by using yocto SDK. The first step here is to generate the 
kernel development source headers. This is achieved by appending the following in
your yocto local.conf file.</p>

<figure class="highlight"><pre><code class="language-text" data-lang="text">TOOLCHAIN_TARGET_TASK_append = " kernel-devsrc"</code></pre></figure>

<p>Now, build the SDK.</p>

<figure class="highlight"><pre><code class="language-text" data-lang="text">bitbake core-image-minimal -c populate_sdk</code></pre></figure>

<p>You might still face a problem like -</p>

<figure class="highlight"><pre><code class="language-text" data-lang="text">./include/uapi/asm-generic/int-ll64.h:12:10: fatal error: asm/bitsperlong.h: No such file or directory
 #include &lt;asm/bitsperlong.h&gt;</code></pre></figure>

<p>This was pretty annoying so I did the following to resolve this issue. I had to go to the 
 SDK folder and had to run scripts and prepare command to fix those issues.</p>

<figure class="highlight"><pre><code class="language-text" data-lang="text">root@shreyas-VirtualBox:/opt/poky/2.7.3/sysroots/cortexa9t2hf-neon-poky-linux-gnueabi/lib/modules/4.19.0-xilinx-v2019.1/build$source /opt/poky/2.7.3/environment-setup-cortexa9t2hf-neon-poky-linux-gnueabi
uild$make scripts
$make prepare</code></pre></figure>

<p><strong>PLL - Phase locked loop</strong>
This is a part of processor, the PLL lives inside the processor. The PLL job is to give clocks to different
peripherals. Also, PLL can divide or multiply the clock to give different clock rates to a different peripherals 
attached. For e.g. UART baud rate will differ based on the clock rate being given by the PLL. In short, processor
gets the clock from oscillator, external or something else. Next, the PLL lives inside the processor. The PLL job
is to give different clock rates to different peripherals. The PLL can be configured to give a different clock
rate to a particular peripheral. PLL stands for phase locked loop. It is a controlled circuit.</p>

<p><a href="https://drive.google.com/open?id=1UcFAOTKosQ9m8bufOg3s5oGMPxCNyaVF">Zedboard reference guide</a></p>

<p>This brings an end to this article. Here is the entire embedded system running.</p>]]></content><author><name>Shreyas Joshi</name></author><category term="Embedded_Linux" /><summary type="html"><![CDATA[A historical Yocto and Zynq walkthrough for compiling, loading, and debugging a device tree overlay.]]></summary></entry><entry><title type="html">Booting a MicroZed Linux Root Filesystem over NFS</title><link href="https://joshis1.github.io/embedded_linux/2020/03/26/Zedboard_Yocto_NFS.html" rel="alternate" type="text/html" title="Booting a MicroZed Linux Root Filesystem over NFS" /><published>2020-03-26T01:13:31+00:00</published><updated>2020-03-26T01:13:31+00:00</updated><id>https://joshis1.github.io/embedded_linux/2020/03/26/Zedboard_Yocto_NFS</id><content type="html" xml:base="https://joshis1.github.io/embedded_linux/2020/03/26/Zedboard_Yocto_NFS.html"><![CDATA[<p>This walkthrough records an NFS-root setup for an Avnet MicroZed Zynq board and an Ubuntu 18.04 development VM. It is specific to that older environment and is not a current production recipe.</p>

<blockquote>
  <p><strong>Security:</strong> NFSv2 is obsolete and should not be enabled on an exposed or production network. The original setup also used <code class="language-plaintext highlighter-rouge">no_root_squash</code>, which lets a remote root user act as root on the exported files. The safer export example below omits that option and limits access to a trusted lab subnet. Prefer a supported NFS version for new systems.</p>
</blockquote>

<h2 id="install-the-nfs-server">Install the NFS server</h2>

<p>Install the server and client utilities if they are not already present.</p>

<figure class="highlight"><pre><code class="language-text" data-lang="text">$sudo apt-get install --reinstall nfs-common nfs-kernel-server</code></pre></figure>

<h2 id="check-the-enabled-nfs-versions">Check the enabled NFS versions</h2>

<p>This original kernel used NFSv2. Ubuntu 18.04 did not enable that version in my configuration. Do not copy this compatibility change to a current system; update the embedded kernel and use a supported NFS version instead.</p>

<p><strong>How to find what NFS Server version is enabled or disabled by Ubuntu</strong></p>

<figure class="highlight"><pre><code class="language-text" data-lang="text">$sudo cat /proc/fs/nfsd/versions
  -2 +3 +4 +4.1 +4.2</code></pre></figure>

<p>The ‘-2’ here tells that the nfsd is disabled for the version number ‘2’.
Thus, we need to enable the version 2 for NFS server.</p>

<p>For reference only, these were the 2020 lab steps I used to enable NFSv2 on Ubuntu 18.04:</p>

<p>Go to the following file.</p>

<figure class="highlight"><pre><code class="language-text" data-lang="text">$sudo gedit /etc/default/nfs-kernel-server </code></pre></figure>

<p>Now, edit this file to include the version 2. First, find the line saying - “RPCNFSDCOUNT=8”.
Change this to include Version 2 also. Update/edit as follows to enable NFSv2 on Ubuntu Linux.</p>

<figure class="highlight"><pre><code class="language-text" data-lang="text"># Number of servers to start up
RPCNFSDCOUNT="8 -V 2"</code></pre></figure>

<p>Here is how my entire file looks like.</p>

<figure class="highlight"><pre><code class="language-text" data-lang="text"># Number of servers to start up
RPCNFSDCOUNT="8 -V 2"

# Runtime priority of server (see nice(1))
RPCNFSDPRIORITY=0

# Options for rpc.mountd.
# If you have a port-based firewall, you might want to set up
# a fixed port here using the --port option. For more information, 
# see rpc.mountd(8) or http://wiki.debian.org/SecuringNFS
# To disable NFSv4 on the server, specify '--no-nfs-version 4' here
RPCMOUNTDOPTS="--manage-gids"

# Do you want to start the svcgssd daemon? It is only required for Kerberos
# exports. Valid alternatives are "yes" and "no"; the default is "no".
NEED_SVCGSSD=""

# Options for rpc.svcgssd.
RPCSVCGSSDOPTS=""</code></pre></figure>

<p>Now, restart the NFS Kernel service.</p>

<figure class="highlight"><pre><code class="language-text" data-lang="text">$sudo systemctl restart nfs-kernel-server.service</code></pre></figure>

<p><strong>*Check the nfsd version afterwards</strong></p>

<figure class="highlight"><pre><code class="language-text" data-lang="text">cat /proc/fs/nfsd/versions
+2 +3 +4 +4.1 +4.2</code></pre></figure>

<p>+2 means it is enabled.</p>

<p><strong>How to check the NFS Server status</strong>
Ubuntu 18.04 uses Systemd to manage services.
In order to check the nfs server status. We could run the following command.</p>

<figure class="highlight"><pre><code class="language-text" data-lang="text">shreyas@shreyas-VirtualBox:~$sudo systemctl status nfs-server
● nfs-server.service - NFS server and services
   Loaded: loaded (/lib/systemd/system/nfs-server.service; enabled; vendor preset: enabled)
   Active: active (exited) since Fri 2020-03-06 12:36:08 AEST; 11min ago
  Process: 2908 ExecStopPost=/usr/sbin/exportfs -f (code=exited, status=0/SUCCESS)
  Process: 2907 ExecStopPost=/usr/sbin/exportfs -au (code=exited, status=0/SUCCESS)
  Process: 2906 ExecStop=/usr/sbin/rpc.nfsd 0 (code=exited, status=0/SUCCESS)
  Process: 2917 ExecStart=/usr/sbin/rpc.nfsd $RPCNFSDARGS (code=exited, status=0/SUCCESS)
  Process: 2916 ExecStartPre=/usr/sbin/exportfs -r (code=exited, status=0/SUCCESS)
 Main PID: 2917 (code=exited, status=0/SUCCESS)

Mar 06 12:36:07 shreyas-VirtualBox systemd[1]: Starting NFS server and services...
Mar 06 12:36:08 shreyas-VirtualBox systemd[1]: Started NFS server and services.</code></pre></figure>

<h2 id="export-the-root-filesystem">Export the root filesystem</h2>
<p>You need to be very careful while extracting the microzed root file system. If accidentally,
you place the microzed root file system on your machine’s root file system then nothing will work. The reason is that microzed root file system is built for ARM and not X86. So, be super
careful while extracting the microzed root file system. Here is how I do.</p>

<figure class="highlight"><pre><code class="language-text" data-lang="text"> $mkdir -p /home/shreyas/rootfs_microzed
 $cd /home/shreyas/rootfs_microzed
 $tar -xvf core-image-minimal-microzed-zynq7-20200228041644.rootfs.tar.gz ./</code></pre></figure>

<p><strong>Set permissions for the root filesystem</strong></p>

<figure class="highlight"><pre><code class="language-text" data-lang="text">sudo chown nobody:nogroup rootfs_microzed</code></pre></figure>

<p>Add a restricted export for the trusted development subnet in <code class="language-plaintext highlighter-rouge">/etc/exports</code>. Do not replace the subnet with <code class="language-plaintext highlighter-rouge">*</code> or expose this development root filesystem to an untrusted network.</p>

<figure class="highlight"><pre><code class="language-text" data-lang="text">$sudo vim /etc/exports
/home/shreyas/rootfs_microzed  11.11.0.0/16(rw,sync,root_squash,no_subtree_check)</code></pre></figure>

<p>Now, run the following command to see whether you are exporting this folder correctly or not.
The below command and the output tells me that I am exporting the rootfs_microzed folder through 11.11.0.0/16 interface.</p>

<figure class="highlight"><pre><code class="language-text" data-lang="text">shreyas@shreyas-VirtualBox:~/microzed/poky/u-boot-xlnx(master)$sudo exportfs
[sudo] password for shreyas: 
/home/shreyas/rootfs_microzed
		11.11.0.0/16</code></pre></figure>

<p><strong>Other primary services to check for</strong>
You need to ensure that these services are running properly. Otherwise, the above command can
fail.</p>

<figure class="highlight"><pre><code class="language-text" data-lang="text">$sudo systemctl enable rpcbind.service
$sudo systemctl enable nfs-kernel-server</code></pre></figure>

<p><strong>How to re-export the NFS kernel server folder</strong>
This pretty simple. You just need to run the following command in order to re-export 
the folders.</p>

<figure class="highlight"><pre><code class="language-text" data-lang="text">$sudo exportfs -ra</code></pre></figure>

<p><strong>Firewall note:</strong> NFS may use several RPC services and ports. Do not open all traffic from a broad subnet as a shortcut. Configure the firewall for the exact NFS version and services in use, and keep the lab network isolated.</p>

<h2 id="configure-the-microzed-client">Configure the MicroZed client</h2>
<p>If you have followed my tutorial on
<a href="https://joshis1.github.io/embedded_linux/2020/02/02/Zedboard_Yocto.html">bringing up zedboard</a>
then this is pretty straight forward. By default kernel configuration, the zynq zedboard will enable the NFS version 2.</p>

<p><strong>Setting up Bootargs</strong>
This is pretty important step. What I have done is that I have changed the uboot uEnv.txt 
bootargs to</p>

<figure class="highlight"><pre><code class="language-text" data-lang="text">bootargs=earlyprintk console=ttyPS0,115200 root=/dev/nfs ip=dhcp nfsroot=11.11.11.19:/home/shreyas/rootfs_microzed rw rootwait devtmpfs.mount=1</code></pre></figure>

<p>or you can change the bootargs on the uboot prompt.</p>

<figure class="highlight"><pre><code class="language-text" data-lang="text">set bootargs "earlyprintk console=ttyPS0,115200 root=/dev/nfs ip=dhcp nfsroot=11.11.11.19:/home/shreyas/rootfs_microzed rw rootwait devtmpfs.mount=1"</code></pre></figure>

<p>Here 11.11.11.19 is my Ubuntu 18.04 interface IP address. So, the above command will read the
NFS folder rootfs_microzed from the nfs server 11.11.11.19. The earlyprintk ensures that we 
see some log messages on the serial port until the kernel serial port is setup by the kernel.
The console parameters are same - device - ttyPS0 and the baud rate 115200.</p>

<p>Here is the core-image-minimal-microzed-zynq tar rootfs tar file for you to download.
<a href="https://drive.google.com/open?id=1XJVQ7y7FuixQ0IoXNBwGXZqgJWz8sQe5">microzed root fs</a></p>

<p><strong>Troubleshooting NFS in general</strong></p>

<p>Ensure that the embedded zynq kernel has the following configuration turned on.</p>

<figure class="highlight"><pre><code class="language-text" data-lang="text">CONFIG_ROOT_NFS=y
CONFIG_NFS_FS=y
CONFIG_NFS_V2=y
CONFIG_NFS_COMMON=y
CONFIG_LOCKD=y
CONFIG_LOCKD_V4=y</code></pre></figure>

<p>Here is the way to check these configurations in yocto</p>

<figure class="highlight"><pre><code class="language-text" data-lang="text">bitbake -c menuconfig virtual/kernel</code></pre></figure>

<p>In case the above command fails, then do install the ncurses package so that the graphics 
can be rendered.</p>

<figure class="highlight"><pre><code class="language-text" data-lang="text">$sudo apt-get install ncurses-devel</code></pre></figure>

<p>Now, check the NFS configuration in the kernel, in the menuconfig do the following.
Escape and forward slash i.e. ‘/’ and type NFS in the search configuration parameter window.
You should check for NFS_COMMON , NFS_FS, NFS_V2, ROOTFS_NFS. They all should be set to ‘y’.</p>

<p>After changing the menuconfig, you might need to recompile the kernel. In Yocto, we do this using the following command.</p>

<figure class="highlight"><pre><code class="language-text" data-lang="text">$bitbake virtual/kernel -c cleansstate
$bitbake virtual/kernel -c compile -f</code></pre></figure>

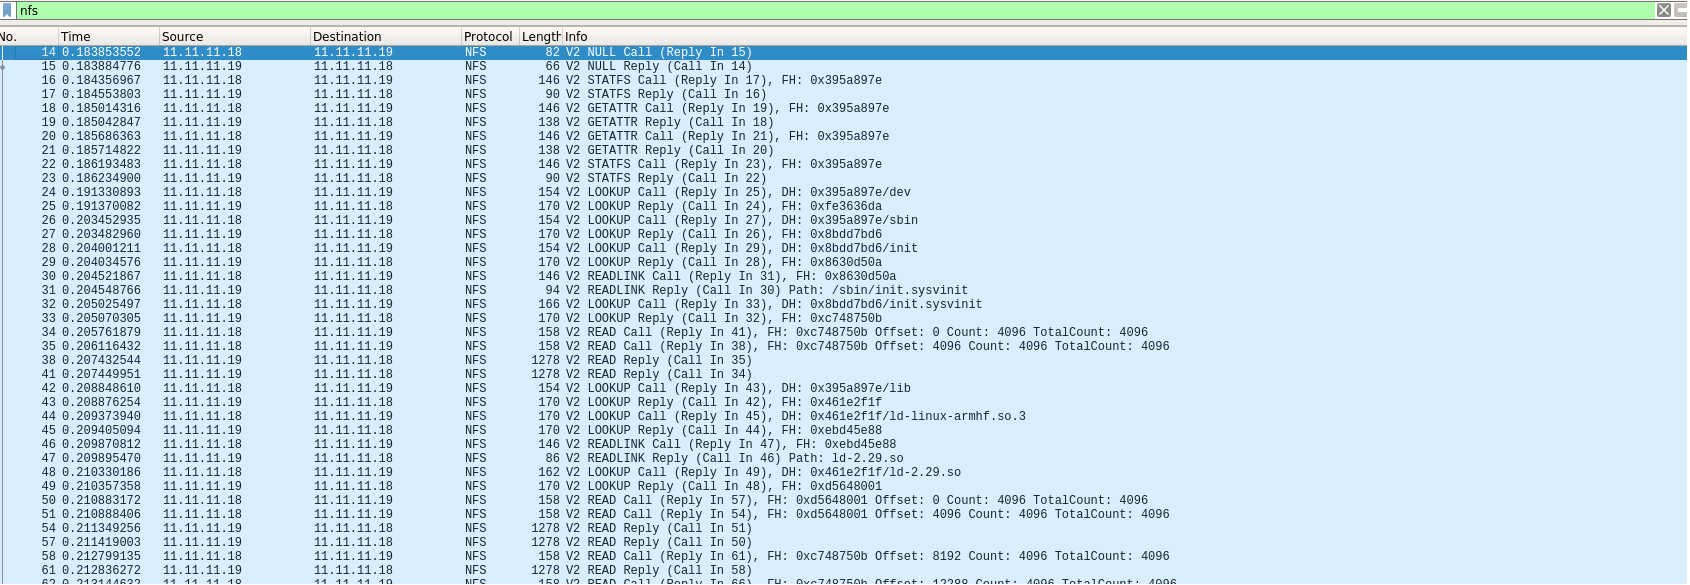
<p>Also, if it is still not working then it worth to check using wireshark and check for NFS protocol. Here is the screen shot of wireshark. You should see something like this. Here 11.11.11.19 is the server ip address and 11.11.11.18 is the NFS client i.e. zynq zedboard.</p>

<p><img src="/assets/img/nfs_wireshark.png" alt="NFS Wireshark" /></p>

<p>This brings an end to this article.</p>]]></content><author><name>Shreyas Joshi</name></author><category term="Embedded_Linux" /><summary type="html"><![CDATA[A historical Yocto and MicroZed NFS-root walkthrough, including server setup, kernel configuration, and boot arguments.]]></summary></entry><entry><title type="html">Submitting My First Linux Kernel Patch</title><link href="https://joshis1.github.io/embedded_linux/2020/03/05/submit_kernel_patch.html" rel="alternate" type="text/html" title="Submitting My First Linux Kernel Patch" /><published>2020-03-05T02:23:31+00:00</published><updated>2020-03-05T02:23:31+00:00</updated><id>https://joshis1.github.io/embedded_linux/2020/03/05/submit_kernel_patch</id><content type="html" xml:base="https://joshis1.github.io/embedded_linux/2020/03/05/submit_kernel_patch.html"><![CDATA[<p>This is all about my journey to submit my first kernel patch. Here I have discussed all the important things you must know before you submit your kernel patch and also respond to the feedbacks.</p>

<p><strong>How to check code style before submitting the patch?</strong></p>

<p>Kernel community uses a very different coding style and is a bit different. But, what they have done is that they have created a script to check the coding style before we send the code for review.</p>

<p>For e.g, if you have changed the file - da9062-core.c</p>

<figure class="highlight"><pre><code class="language-text" data-lang="text">perl scripts/checkpatch.pl  -f drivers/mfd/da9062-core.c</code></pre></figure>

<p>In order to run checkpatch.pl, you need to install a few python modules.</p>

<figure class="highlight"><pre><code class="language-text" data-lang="text">$sudo apt-get install python-pip
$pip install gitpython</code></pre></figure>

<p>Sometimes, I get an error that my pip version is older and I need to upgrade it. The best way to upgrade pip version is to not use sudo command but the following command.</p>

<figure class="highlight"><pre><code class="language-text" data-lang="text"> $pip install --upgrade --user pip</code></pre></figure>

<p>Since python packages are used by Operating system too. If we use sudo then it will interfere with the OS python packages and it might overwrite them. This will lead to system not working. Instead of installing for system we should install for the user.</p>

<p>Another way of installing pip package is</p>

<p><strong>using virtual environment.</strong></p>

<figure class="highlight"><pre><code class="language-text" data-lang="text">$sudo apt install virtualenv

$virtualenv venv

$source venv/bin/activate

$virtualenv -p /usr/bin/python2.7 venv</code></pre></figure>

<p><strong>How to commit your changes?</strong></p>

<p>One need to sign-off using git commit -s.
By signing, you agree with the kernel policies.</p>

<figure class="highlight"><pre><code class="language-text" data-lang="text">$git commit -s </code></pre></figure>

<p><strong>How to give git commit message?</strong></p>

<figure class="highlight"><pre><code class="language-text" data-lang="text"> mfd: da9062: add support for interrupt polarity defined in device tree
    
 The da9062 interrupt handler cannot necessarily be low active.
 Add a helper function to read the polarity defined in the device tree.
 Based on the user defined polarity in device tree, the interrupt is set active.
 </code></pre></figure>

<p>Here mfd:da9062 is the file showing drivers/mfd/da9062-core.c</p>

<p>In case, you are not happy about your commit, you can again commit the code using.</p>

<figure class="highlight"><pre><code class="language-text" data-lang="text">$git commit --amend &lt;files update&gt;</code></pre></figure>

<p><strong>How to generate a patch file?</strong></p>

<figure class="highlight"><pre><code class="language-text" data-lang="text">$git format-patch HEAD~&lt;number of commits to convert to patches&gt;</code></pre></figure>

<p><strong>How to add revision history?</strong></p>

<p>Generally the maintainers are quite keen to see the revision history as it helps them to review. It is best to hand modify the file generated from ‘git format-patch” to add the version history to the patch. It is not part of the commit message and should go below the ‘—’ line and above the information regarding the files touched by the patch and the number of changes, so in my case:</p>

<figure class="highlight"><pre><code class="language-text" data-lang="text">The da9062 interrupt handler cannot necessarily be low active.

Add a function to configure the interrupt type based on what is defined in the device tree.
The allowable interrupt type is either low or high level trigger.

Signed-off-by: XX &lt;xx@xx.com&gt;

---

V3:

     Fixed issue with ….

V2:

     Updates relating to ……

drivers/mfd/da9062-core.c | 43 ++++++++++++++++++++++++++++++++++++---

1 file changed, 40 insertions(+), 3 deletions(-)</code></pre></figure>

<p><strong>How to see maintainers list for the changes you made?</strong></p>

<figure class="highlight"><pre><code class="language-text" data-lang="text">$perl scripts/get_maintainer.pl  &lt;patch file&gt;</code></pre></figure>

<p><strong>How to apply the patch file?</strong></p>

<p>The patch file can be applied using the command.</p>

<figure class="highlight"><pre><code class="language-text" data-lang="text">$git am &lt;patchfile&gt;</code></pre></figure>

<p><strong>How to use git send-email?</strong></p>

<p>Install git-email</p>

<figure class="highlight"><pre><code class="language-text" data-lang="text">$sudo apt-get install git-email</code></pre></figure>

<p><strong>How to find the messageID of the email in order to reply.</strong></p>

<p>Please refer to this link.
(message id)[https://www.codetwo.com/kb/messageid/]</p>

<p><strong>How to setup the git email client</strong></p>

<p>Setting up an email client</p>

<figure class="highlight"><pre><code class="language-text" data-lang="text">~/.gitconfig
[sendemail]
  ; setup for using git send-email; prompts for password
  smtpuser = myemailaddr@gmail.com
  smtpserver = smtp.googlemail.com
  smtpencryption = tls
  smtpserverport = 587</code></pre></figure>

<p><strong>Example to send the patch -</strong></p>

<figure class="highlight"><pre><code class="language-text" data-lang="text">$git send-email  --cc linux-kernel@vger.kernel.org  C:\Users\xx\Documents\0001-mfd-da9062-Add-support-for-interrupt-polarity-def.patch</code></pre></figure>

<p><strong>Example to re-send the patch, basically replying on to the email using revised patch.</strong></p>

<figure class="highlight"><pre><code class="language-text" data-lang="text">$git send-email  --cc linux-kernel@vger.kernel.org --in-reply-to AM6PR10MB22635CBCBF559AEB9A5C2BFF80120@AM6PR10MB2263.EURPRD10.PROD.OUTLOOK.COM C:\Users\xx\Documents\0001-mfd-da9062-Add-support-for-interrupt-polarity-def.patch</code></pre></figure>

<p>There is another email client called - mutt, but I won’t suggest using mutt because it needs you to turn off the secure settings from your mail server like “allow less secure apps”</p>

<p>Here is the mutt.rc settings</p>

<figure class="highlight"><pre><code class="language-text" data-lang="text">set ssl_starttls=yes
set ssl_force_tls=yes
set imap_user = 'email@gmail.com'
set imap_pass = 'XXXX' --&gt; set Password here.
set from='email-address'
set realname='XXX'
set folder = imaps://imap.gmail.com/
set spoolfile = imaps://imap.gmail.com/INBOX
set postponed="imaps://imap.gmail.com/[Gmail]/Drafts"
set header_cache = "~/.mutt/cache/headers"
set message_cachedir = "~/.mutt/cache/bodies"
set certificate_file = "~/.mutt/certificates"
set smtp_url = 'smtp://&lt;email-id&gt;@smtp.gmail.com:587/'
set smtp_pass = $imap_pass
set move = no
set imap_keepalive = 900</code></pre></figure>

<p><strong>Setting up your local environment to show the git branch?</strong></p>

<p>This is pretty helpful and it will save your time. After this you don’t have to run ‘git branch’ to know what branch you are working at. Add this line to your bash.rc in order to see what branch you are working in?</p>

<figure class="highlight"><pre><code class="language-text" data-lang="text">PS1="\u@\h\[\033[00m\]:\[\033[01;36m\]\w\[\033[00m\]\[\033[01;34m\]\$(git branch --no-color 2&gt; /dev/null | sed -e '/^[^*]/d' -e 's/* \(.*\)/(\1)/')\[\033[00m\]\$"</code></pre></figure>

<p>Here is the output and you can see that I am onto the warrior branch.</p>

<p><img src="/assets/img/git_warrior_branch.png" alt="git branch on the shell" /></p>

<p>Useful links</p>

<p><a href="https://lore.kernel.org/patchwork/project/lkml/list/">kernel patches</a></p>

<p>This brings an end to this article. It’s a good idea to give back to the open source community like linux kernel.</p>]]></content><author><name>Shreyas Joshi</name></author><category term="Embedded_Linux" /><summary type="html"><![CDATA[Notes from preparing, revising, and emailing a first Linux kernel patch, including historical workflow caveats.]]></summary></entry><entry><title type="html">Linux and Windows Utilities: Practical Notes, Part 1</title><link href="https://joshis1.github.io/utilities/2020/03/05/linux-windows-utility-1.html" rel="alternate" type="text/html" title="Linux and Windows Utilities: Practical Notes, Part 1" /><published>2020-03-05T01:23:31+00:00</published><updated>2020-03-05T01:23:31+00:00</updated><id>https://joshis1.github.io/utilities/2020/03/05/linux-windows-utility-1</id><content type="html" xml:base="https://joshis1.github.io/utilities/2020/03/05/linux-windows-utility-1.html"><![CDATA[<p>This article collects short answers to common Linux and Windows questions. The examples reflect the tools available when these notes were written; check local versions and options before using them.</p>

<h2 id="encrypting-a-file">Encrypting a file</h2>

<p>For new workflows, consider a maintained file-encryption tool such as <code class="language-plaintext highlighter-rouge">age</code>. If you use OpenSSL, use a current version and a strong passphrase. Avoid putting a passphrase directly on the command line, where it may be exposed in shell history or process listings. OpenSSL versions that support PBKDF2 can prompt for the passphrase:</p>

<figure class="highlight"><pre><code class="language-text" data-lang="text">openssl enc -aes-256-cbc -salt -pbkdf2 -iter 600000 -in password.txt -out password.enc</code></pre></figure>

<p>Decrypt with the same options:</p>

<figure class="highlight"><pre><code class="language-text" data-lang="text">openssl enc -d -aes-256-cbc -pbkdf2 -iter 600000 -in password.enc -out password.txt</code></pre></figure>

<p>AES is a symmetric cipher: the same secret is used to encrypt and decrypt. CBC mode does not authenticate the file, so successful decryption alone does not prove that the file has not been modified. Prefer an authenticated encryption format or a tool designed for file encryption when choosing a new workflow.</p>

<h2 id="removing-a-directory-with-an-unusual-name">Removing a directory with an unusual name</h2>

<p>For file deletions, one trick is to wildcard as much of the name as you can, and use the -i (interactive) option to decide what subset of the matches to delete, one by one. The rmdir command does not have that, but the recursive file removal will deal with directories. E.g.</p>

<figure class="highlight"><pre><code class="language-text" data-lang="text">rm -r -i -- AB*20191217-163059*</code></pre></figure>

<p>Review every prompt before confirming deletion. If the directory name begins with <code class="language-plaintext highlighter-rouge">-</code>, use <code class="language-plaintext highlighter-rouge">--</code> before it so it is not interpreted as an option.</p>

<h2 id="using--exec-with-find">Using <code class="language-plaintext highlighter-rouge">-exec</code> with <code class="language-plaintext highlighter-rouge">find</code></h2>

<p><code class="language-plaintext highlighter-rouge">-exec</code> is a <code class="language-plaintext highlighter-rouge">find</code> action that runs another command on each matching path.</p>

<p><strong>Example</strong></p>

<figure class="highlight"><pre><code class="language-text" data-lang="text">find . -type f \( -iname '*.c' -o -iname '*.h' -o -iname '*.l' \) -exec grep -in 'test1' /dev/null {} \;</code></pre></figure>

<p>For C and header files only:</p>

<figure class="highlight"><pre><code class="language-text" data-lang="text">find . -type f -iname '*.[ch]' -exec grep -in 'test1' /dev/null {} \;</code></pre></figure>

<p><code class="language-plaintext highlighter-rouge">{}</code> is replaced with each matched path. The escaped semicolon closes the <code class="language-plaintext highlighter-rouge">-exec</code> action for <code class="language-plaintext highlighter-rouge">find</code> rather than the shell.</p>

<h2 id="running-a-dhcp-server-on-windows">Running a DHCP server on Windows</h2>

<p>Here is the utility that I use in Windows10 to run my DHCP server.</p>

<p><a href="https://www.dhcpserver.de/cms/">dhcp server</a></p>

<h2 id="discovering-active-hosts-on-your-own-network">Discovering active hosts on your own network</h2>

<p>Nmap can help inventory hosts on a network you own or are authorized to administer. Keep the target range within that scope.</p>

<figure class="highlight"><pre><code class="language-text" data-lang="text">sudo nmap -sn 11.11.11.1-254

Starting Nmap 7.40 ( https://nmap.org ) at 2020-03-29 22:59 PDT
Nmap scan report for 11.11.11.1
Host is up (-0.099s latency).
MAC Address: 00:1B:21:A7:62:44 (Intel Corporate)
Nmap scan report for 11.11.11.4
Host is up (0.00069s latency).
MAC Address: 78:45:01:05:98:40 (Unknown)
Nmap scan report for 11.11.11.3
Host is up.
Nmap done: 254 IP addresses (3 hosts up) scanned in 15.42 seconds </code></pre></figure>

<h2 id="searching-files-without-recursing-into-directories">Searching files without recursing into directories</h2>
<p>Here -d skip means skip looking into the directory.
Next -H means print the file names.
Generally, the ‘-d skip’ is used with the find and exec.</p>

<figure class="highlight"><pre><code class="language-text" data-lang="text">find ./ -exec grep -d skip -H 'asf' {} \;</code></pre></figure>

<h2 id="increasing-a-virtual-machines-disk-size">Increasing a virtual machine’s disk size</h2>
<p>Many times, you will realise that your virtual machine box needs more space then you have allocated previously.
I faced this issue while using yocto in my virtual machine running Ubuntu. Here is what I referred to increase
the size of my virtual machine box -</p>

<p><a href="https://drive.google.com/open?id=1ZLMDLuKJZ9nKfB_6DXYVlBid0gCLYsS9">Enlarge Virtual Machine disk space</a></p>

<p>This brings an end to this article. This article was just to touch some
common commands and utilities to address common problems or tasks.</p>]]></content><author><name>Shreyas Joshi</name></author><category term="Utilities" /><summary type="html"><![CDATA[Practical notes on Linux and Windows utilities, with safer file-encryption guidance and command examples.]]></summary></entry><entry><title type="html">Bringing Up Avnet MicroZed Linux with Yocto</title><link href="https://joshis1.github.io/embedded_linux/2020/02/02/Zedboard_Yocto.html" rel="alternate" type="text/html" title="Bringing Up Avnet MicroZed Linux with Yocto" /><published>2020-02-02T01:13:31+00:00</published><updated>2020-02-02T01:13:31+00:00</updated><id>https://joshis1.github.io/embedded_linux/2020/02/02/Zedboard_Yocto</id><content type="html" xml:base="https://joshis1.github.io/embedded_linux/2020/02/02/Zedboard_Yocto.html"><![CDATA[<p>This historical walkthrough records the steps I used to build U-Boot, a Linux kernel, a device tree, and a root filesystem for an Avnet MicroZed Zynq-7010 board using Yocto Warrior.
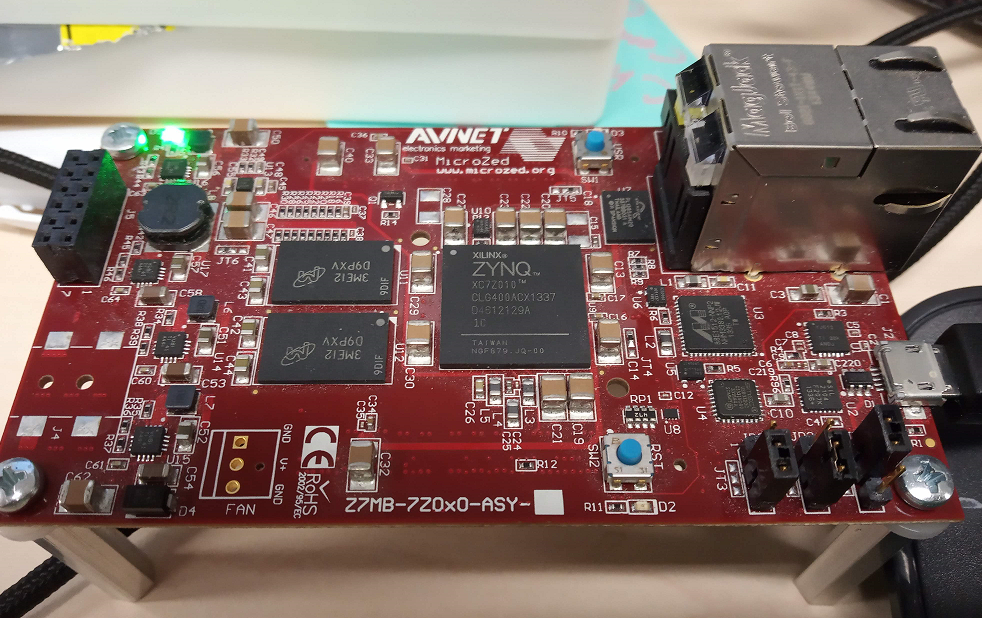
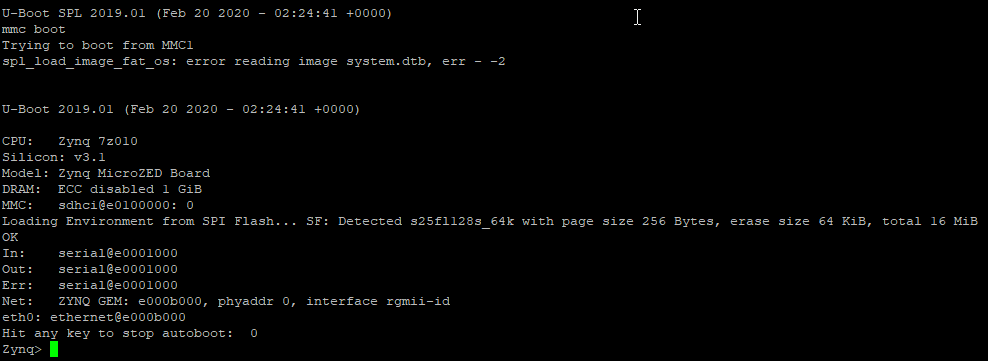
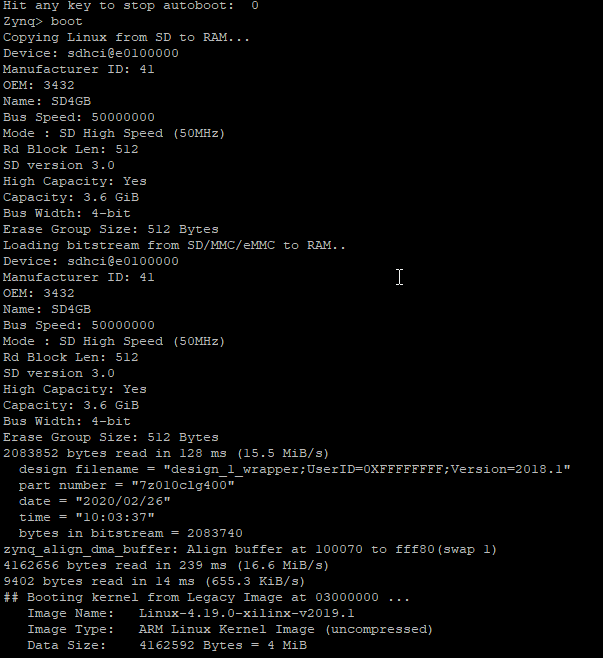
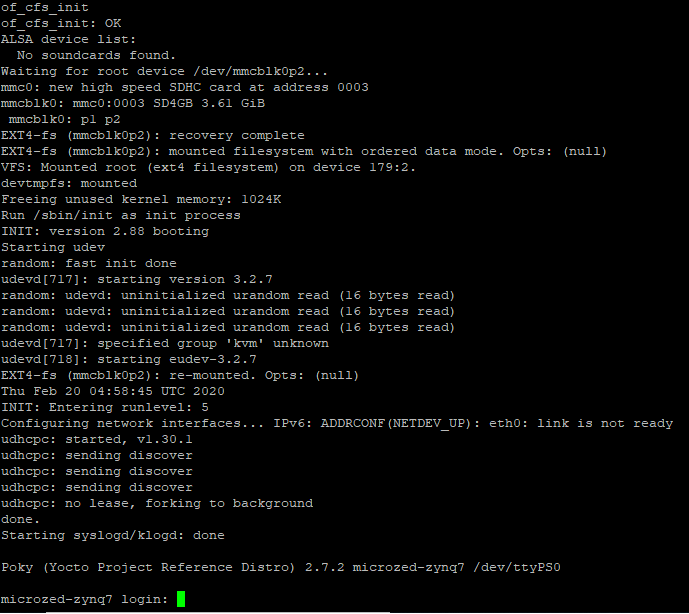
Also, I will touch on how to create the fpga bit stream to program the Programming logic(PL). I have no experience in fpga but I would like to touch the fpga bit stream topic for the sake of completeness. Basically, a fully functional system where we can do tweaks later on. This is all about setting up the foundation to load the operating environment on the Avnet microZed using sd card/mmc. The model name is  Z7MB-7z0x0-ASY.</p>

<p><img src="/assets/img/AVNET_Zedboard.png" alt="MicroZed Zynq AVNET" /></p>

<p><strong>Motivation to do this?</strong></p>

<p>I don’t want to use Petalinux which abstracts a lot of details from the user. Instead, I would like to use Yocto build system. 
Here, in this blog, I am using warrior release of yocto.</p>

<p><strong>Setup</strong> - I am using Ubuntu 18.04 on Windows 10 host machine.
I had a little bit of trouble finding what version of virtual box works with Ubuntu 18.04. I found that the version Virtual box 6.1.2 running guest OS - Ubuntu 18.04 works well on Windows 10 host machine.
Here is the link - <a href="https://forums.virtualbox.org/viewtopic.php?f=6&amp;t=97052">virtualboxForum</a>  Make sure you install the guest additions too for 6.1.2. Before you run the Guest Addition program, ensure you have installed the build-essential linux-headers-generic. Also, you might have to install build-essential gcc make perl dkms. I have given 50Gb to create Ubuntu virtual machine that should be sufficient to build the entire operating environment for microZed board.</p>

<p><strong>Pre-requisite</strong></p>

<p>Install the essentials in order to use Yocto.</p>

<p><a href="https://www.yoctoproject.org/docs/1.8/yocto-project-qs/yocto-project-qs.html">Yocto</a></p>

<p><strong>Ubuntu and Debian</strong>
The essential and graphical support packages you need for a supported Ubuntu or Debian distribution are shown in the following command:</p>

<figure class="highlight"><pre><code class="language-text" data-lang="text">	 $sudo apt-get install gawk wget git-core diffstat unzip texinfo gcc-multilib \
     build-essential chrpath socat cpio python python3 python3-pip python3-pexpect \
     xz-utils debianutils iputils-ping python3-git python3-jinja2 libegl1-mesa libsdl1.2-dev \
     pylint3 xterm</code></pre></figure>

<p><strong>Create your workspace.</strong></p>

<figure class="highlight"><pre><code class="language-text" data-lang="text">$ mkdir -p microzed
$cd microzed

git clone -b &lt;branch&gt; &lt;remote_repo&gt;</code></pre></figure>

<p>The branch I am going to use here is Warrior. Checkout Poky - Warrior.</p>

<figure class="highlight"><pre><code class="language-text" data-lang="text">git clone -b warrior git://git.yoctoproject.org/poky   

cd poky &lt;Get inside the poky folder</code></pre></figure>

<p><strong>Layers we are using</strong></p>

<figure class="highlight"><pre><code class="language-text" data-lang="text">a) meta-openembedded  and what it provides - read README -  [meta-openembedded](https://github.com/openembedded/meta-openembedded/blob/master/README)
b) meta-sourcery  and what it provides - read README - [meta-sourcery](https://github.com/MentorEmbedded/meta-sourcery/blob/master/README.md)
c) u-boot-xlnx  and it provides u-boot - read README - [u-boot-xlnx](https://github.com/Xilinx/u-boot-xlnx/blob/master/README)
d) meta-ezynq and it provides - read README - [meta-ezynq](https://github.com/Elphel/meta-ezynq/blob/master/README.md)
d) meta-external-toolchain and it is needed by meta-sourcery. 
e) meta-xilinx and it provides the definition for the machine microzed-zynq7 - read README - [meta-xilinx](https://github.com/Xilinx/meta-xilinx/blob/master/README.md)</code></pre></figure>

<p>Inside the poky folder, checkout these layers.</p>

<figure class="highlight"><pre><code class="language-text" data-lang="text">1)git clone -b warrior https://github.com/openembedded/meta-openembedded.git
2)git clone -b warrior https://github.com/MentorEmbedded/meta-sourcery.git
3)git clone -b master https://github.com/Xilinx/u-boot-xlnx.git  
4)git clone -b warrior https://github.com/Elphel/meta-ezynq.git
5)git clone -b warrior git://git.yoctoproject.org/meta-external-toolchain
6)git clone -b warrior https://github.com/Xilinx/meta-xilinx.git</code></pre></figure>

<p><strong>Initialize the build</strong></p>

<p>This source command will create a build directory and will cd into build directory. The build directory will have the template for local.conf and bblayers.conf.
Here is the command.</p>

<figure class="highlight"><pre><code class="language-text" data-lang="text">a) cd poky 
b) source oe-init-build-env </code></pre></figure>

<p>Let’s edit bblayers.conf to add layers to the recipe.</p>

<figure class="highlight"><pre><code class="language-text" data-lang="text">$kate conf/bblayers.conf 
# POKY_BBLAYERS_CONF_VERSION is increased each time build/conf/bblayers.conf
# changes incompatibly
POKY_BBLAYERS_CONF_VERSION = "2"

BBPATH = "${TOPDIR}"
BBFILES ?= ""

BBLAYERS ?= " \
  ${TOPDIR}/../meta \
  ${TOPDIR}/../meta-poky \
  ${TOPDIR}/../meta-yocto-bsp \
  ${TOPDIR}/../meta-openembedded/meta-oe \
  ${TOPDIR}/../meta-external-toolchain \
  ${TOPDIR}/../meta-sourcery\
  ${TOPDIR}/../meta-ezynq\
  ${TOPDIR}/../meta-xilinx/meta-xilinx-bsp \
  "</code></pre></figure>

<p>Now, edit local.conf to tell what machine architecture we are building for.</p>

<figure class="highlight"><pre><code class="language-text" data-lang="text">$kate conf/local.conf 
MACHINE ?= "microzed-zynq7"</code></pre></figure>

<p>Now, you are good to go. Let’s build the Secondary Program Loader (SPL) u-boot image. The SPL image replaces the need for first stage boot loader i.e. fsbl.</p>

<p><strong>Build U-Boot</strong>
This will create boot.bin, u-boot.img.</p>

<figure class="highlight"><pre><code class="language-text" data-lang="text">$ bitbake virtual/bootloader</code></pre></figure>

<p><strong>Build minimal working uImage, dtb and rootfile system</strong></p>

<figure class="highlight"><pre><code class="language-text" data-lang="text">$bitbake core-image-minimal</code></pre></figure>

<p>This is how it looks on the terminal.</p>

<p><img src="/assets/img/bitbake.png" alt="bitbake" /></p>

<p><strong>Generating fpga bit stream for microZed.</strong></p>

<p>In order to build fpga bit stream, we will use Vivado. I have installed 
Vivado on my Windows 10 machine.</p>

<p>By default, Vivado doesn’t have board files for microzed zynq 7010 from AVNET. So, we need to download the board files of microzed zynq7. Here is the link to download the board files. If the link doesn’t exist then you can also do a google search for microzed-zynq7 board files.</p>

<p>Some people use Xilinx Vitis IDE to generate FPGA program. The most popular language for 
FPGA is VHDL. <a href="https://www.xilinx.com/products/design-tools/vitis.html">Vitis</a></p>

<p><a href="http://zedboard.org/content/board-definition-files-0">zynq-microzed-7010x-board-definition</a></p>

<p>Copy the board definition files at the location -</p>

<figure class="highlight"><pre><code class="language-text" data-lang="text">C:\Xilinx\Vivado\2018.1\data\boards\board_files</code></pre></figure>

<p>or if you are not a regular Windows OS user, then you can use this link for reference <a href="https://www.youtube.com/watch?v=n7A0_twGPlI">Vivado_Board_File_Installation</a></p>

<p>Now, you should be able to select the board for Zynq-7010x.
I have followed this tutorial to generate the bitstream</p>

<p><a href="http://www.fpgadeveloper.com/2014/07/creating-a-base-system-for-the-zynq-in-vivado.html">creating basic fpga program</a></p>

<p>Here is my fpga project.</p>

<p><a href="https://github.com/joshis1/avnet_microzed_fpga.git">My FPGA project</a></p>

<p>Once you run it, Vivado generates the bit file in runs\impl_1 folder in the project directory.</p>

<p><strong>Prepare hardware system</strong></p>

<figure class="highlight"><pre><code class="language-text" data-lang="text">1) Setup the Jumper settings accurately to do sdboot 

Follow this - [AVNET Getting Started](http://zedboard.org/sites/default/files/documentations/MicroZed_GettingStarted_v1_0.pdf )

see Page 11.

2) Prepare sd card.

a) Partition the sd card into two partition.

i) FAT 32 - maximum 800 MB is good enough.
ii) EXT4 -  Rest of the sd card space.</code></pre></figure>

<p>I use gpart application to do the partitiion. You need to enable USB in the virtual box. You might need to restart the virtual box after enabling the usb device.</p>

<p>Now copy, boot.bin, devicetree.dtb, u-boot.img uEnv.txt and uImage in the FAT partitiion. Also, if you have created the fpga bit stream then you could copy the fpga bit stream here.</p>

<p>boot.bin is the SPL image and it will look for u-boot.img. 
u-boot.img will look for devicetree.dtb to set parameters for the kernel. For e.g, what clock rate, i2c devices the board needs is all defined in the devicetree. uImage i.e Kernel will refer to the device tree in order to configure and probe the required drivers. When the kernel starts, it reads this file (called dtb for Device Tree Binary) to know the devices on the board, and initialize useful drivers. Basically, SPL image uses PS7 i.e. processor system 
ps7_init.c and ps7_init.h from the xilinix board. In case you are not using microzed zynq, then you might need to 
generate ps7_init.c and ps7_init.h using xilinix tool. Next, you need to copy these files to uboot-xilinx.
The PS7_init.c does a lot of things like - resetting the SLCR - System level control registers and rom boot loader.
It starts by resetting the processor.</p>

<p><strong>Copy Root File System</strong></p>

<p>Mount EXT4 to some <mountpoint>
unpack the rootfs.tar.gz</mountpoint></p>

<figure class="highlight"><pre><code class="language-text" data-lang="text">tar -C &lt;mountpoint&gt; -xzpf rootfs.tar.gz</code></pre></figure>

<p><strong>Poking with u-boot environment.</strong></p>

<p>By default, my system had the following sdboot value.</p>

<figure class="highlight"><pre><code class="language-text" data-lang="text">sdboot=echo Copying Linux from SD to RAM... &amp;&amp; mmcinfo &amp;&amp; run mmc_loadbit_fat &amp;&amp; fatload mmc 0 0x3000000 ${kernel_image} 
&amp;&amp; fatload mmc 0 0x2A00000 ${devicetree_image} &amp;&amp; fatload mmc 0 0x2000000 ${ramdisk_image} &amp;&amp; bootm 0x3000000 0x2000000 0x2A00000</code></pre></figure>

<p>ramdisk_image=uramdisk.image.gz</p>

<p>Here you can see, it is trying to boot the ramdisk image i.e. rather than mounting the root file system, it’s going to load the root file system on the RAM.</p>

<p>By the way, when you build, you must be wondering where is uramdisk.image.gz. Basically uramdisk.image.gz is nothing but</p>

<figure class="highlight"><pre><code class="language-text" data-lang="text">"uramdisk.image.gz" is just another name for "*.cpio.gz.u-boot"</code></pre></figure>

<p>So, if you don’t want to mount ext4 partitiion, you can use ramdisk_image. Otherwise, you can change the sdboot to</p>

<figure class="highlight"><pre><code class="language-text" data-lang="text">setenv sdboot 'echo Copying Linux from SD to RAM...  &amp;&amp; mmcinfo &amp;&amp; run mmc_loadbit_fat &amp;&amp; fatload mmc 0 0x3000000 ${kernel_image}  &amp;&amp; fatload mmc 0 0x2A00000 ${devicetree_image} &amp;&amp; bootm 0x3000000 - 0x2A00000'</code></pre></figure>

<p><strong>Loading the fpga bit stream</strong></p>

<p>I have given a name to the fpga bit stream as custom_ip.bit here.</p>

<figure class="highlight"><pre><code class="language-text" data-lang="text">fatload mmc 0 ${loadbit_addr} custom_ip.bit
fpga loadb 0 ${loadbit_addr} $filesize</code></pre></figure>

<p><strong>Setting the u-boot environment</strong></p>

<figure class="highlight"><pre><code class="language-text" data-lang="text">setenv mmc_loadbit_fat 'echo Loading bitstream from SD/MMC/eMMC to RAM.. &amp;&amp; mmcinfo &amp;&amp; fatload mmc 0 ${loadbit_addr} ${bitstream_image} &amp;&amp; fpga loadb 0 ${loadbit_addr} ${filesize}'</code></pre></figure>

<p>Please note that I am using fpga loadb in order to load the bitstream.
There is no translation required in order to load the fpga bitstream generated from Vivado.</p>

<p><strong>EXT4 Root File System</strong></p>

<p><strong>Telling uboot to mount the rootfile system from where?</strong></p>

<p>This is to identify from where kernel should mount the root file system.</p>

<p>In my case, I did the following in my u-boot.</p>

<figure class="highlight"><pre><code class="language-text" data-lang="text">Zynq&gt; mmc part

Partition Map for MMC device 0  --   Partition Type: DOS

Part    Start Sector    Num Sectors     UUID            Type
  1     2048            1433600         f2ccc02a-01     0b Boot
  2     1435648         6133760         f2ccc02a-02     83</code></pre></figure>

<p>In this example, the partition table identifies the EXT4 root filesystem as <code class="language-plaintext highlighter-rouge">/dev/mmcblk0p2</code>. <code class="language-plaintext highlighter-rouge">mmcblk0</code> is the first MMC device and <code class="language-plaintext highlighter-rouge">p2</code> is its second partition. Confirm the partition number on your own card; it must match the partition table.</p>

<p>Now, set the u-boot environment variable bootargs, which eventually is passed to the kernel.
Kernel uses this environment variable to set the console, root file system and other parameters.</p>

<figure class="highlight"><pre><code class="language-text" data-lang="text">set bootargs earlyprintk console=ttyPS0,115200 root=/dev/mmcblk0p2 rw rootwait devtmpfs.mount=1</code></pre></figure>

<p>There are many commands supported by the u-boot. Here is the help.</p>

<figure class="highlight"><pre><code class="language-text" data-lang="text">Zynq&gt; help
?       - alias for 'help'
base    - print or set address offset
bdinfo  - print Board Info structure
blkcache- block cache diagnostics and control
boot    - boot default, i.e., run 'bootcmd'
bootd   - boot default, i.e., run 'bootcmd'
bootefi - Boots an EFI payload from memory
bootelf - Boot from an ELF image in memory
bootm   - boot application image from memory
bootp   - boot image via network using BOOTP/TFTP protocol
bootvx  - Boot vxWorks from an ELF image
bootz   - boot Linux zImage image from memory
clk     - CLK sub-system
cmp     - memory compare
coninfo - print console devices and information
cp      - memory copy
crc32   - checksum calculation
dcache  - enable or disable data cache
dfu     - Device Firmware Upgrade
dhcp    - boot image via network using DHCP/TFTP protocol
dm      - Driver model low level access
echo    - echo args to console
editenv - edit environment variable
env     - environment handling commands
exit    - exit script
ext2load- load binary file from a Ext2 filesystem
ext2ls  - list files in a directory (default /)</code></pre></figure>

<p>You can view the current environment variables using the following command.</p>

<figure class="highlight"><pre><code class="language-text" data-lang="text">Zynq&gt; printenv
baudrate=115200
bitstream_image=custom_ip.bit
bitstream_size=0x3DBAFC
bootargs=earlyprintk console=ttyPS0,115200 root=/dev/mmcblk0p2 rw rootwait devtmpfs.mount=1
bootcmd=run $modeboot
bootdelay=3
devicetree_image=devicetree.dtb
devicetree_size=0x20000
ethact=Gem.e000b000
ethaddr=00:0a:35:00:01:22
fdt_high=0x20000000
fdtcontroladdr=3eb2de28
fileaddr=100000
filesize=1fcc0c
initrd_high=0x20000000
ipaddr=11.11.11.103
jtagboot=echo TFTPing Linux to RAM... &amp;&amp; tftp 0x3000000 ${kernel_image} &amp;&amp; tftp 0x2A00000 ${devicetree_image} &amp;&amp; tftp 0x2000000 ${ramdisk_image} &amp;&amp; bootm 0x3000000 0x2000000 0x2A00000
kernel_image=uImage
kernel_size=0x500000
loadbit_addr=0x100000
mmc_loadbit_fat=echo Loading bitstream from SD/MMC/eMMC to RAM.. &amp;&amp; mmcinfo &amp;&amp; fatload mmc 0 ${loadbit_addr} ${bitstream_image} &amp;&amp; fpga loadb 0 ${loadbit_addr} ${filesize}
modeboot=sdboot
nandboot=echo Copying Linux from NAND flash to RAM... &amp;&amp; nand read 0x3000000 0x100000 ${kernel_size} &amp;&amp; nand read 0x2A00000 0x600000 ${devicetree_size} &amp;&amp; echo Copying ramdisk... &amp;&amp; nand read 0x2000000 0x620000 ${ramdisk_size} &amp;&amp; bootm 0
x3000000 0x2000000 0x2A00000
nfsdir=/home/shreyas/zynq
norboot=echo Copying Linux from NOR flash to RAM... &amp;&amp; cp 0xE2100000 0x3000000 ${kernel_size} &amp;&amp; cp 0xE2600000 0x2A00000 ${devicetree_size} &amp;&amp; echo Copying ramdisk... &amp;&amp; cp 0xE2620000 0x2000000 ${ramdisk_size} &amp;&amp; bootm 0x3000000 0x200000
0 0x2A00000
othbootargs=init=/bin/bash
qspiboot=echo Copying Linux from QSPI flash to RAM... &amp;&amp; sf probe 0 0 0 &amp;&amp; sf read ${loadbit_addr} 0xC00000 ${bitstream_size} &amp;&amp; mw 0xF8007080 0x30800100 0x4 &amp;&amp; fpga load 0 ${loadbit_addr} ${bitstream_size} &amp;&amp; sf read 0x3000000 0x100000 
${kernel_size} &amp;&amp; sf read 0x2A00000 0x600000 ${devicetree_size} &amp;&amp; echo Copying ramdisk... &amp;&amp; sf read 0x2000000 0x620000 ${ramdisk_size} &amp;&amp; bootm 0x3000000 0x2000000 0x2A00000
ramdisk_image=uramdisk.image.gz
ramdisk_size=0x5E0000
sdboot=echo Copying Linux from SD to RAM...  &amp;&amp; mmcinfo &amp;&amp; run mmc_loadbit_fat &amp;&amp; fatload mmc 0 0x3000000 ${kernel_image}  &amp;&amp; fatload mmc 0 0x2A00000 ${devicetree_image} &amp;&amp; bootm 0x3000000 - 0x2A00000
serverip=11.11.11.3
silent=n
stderr=serial@e0001000
stdin=serial@e0001000
stdout=serial@e0001000</code></pre></figure>

<p><img src="/assets/img/uboot_putty.png" alt="Uboot - SPL" /></p>

<p>U-Boot runs code placed in (processor’s) RAM,  although it can also read data from other media. The boot process normally takes place in two steps:</p>

<figure class="highlight"><pre><code class="language-text" data-lang="text">1) Reading the OS image from media (Ethernet, flash, USB, MMC) into RAM
2) Jumping to the first instruction of the image in RAM</code></pre></figure>

<p>In order to read an image from an MMC card formatted in FAT, 
the command is:</p>

<figure class="highlight"><pre><code class="language-text" data-lang="text">fatload mmc &lt;dev&gt;[:partition] &lt;loadAddress&gt; &lt;bootfilename&gt;</code></pre></figure>

<p><strong>bootm</strong>
This command starts a kernel image running.</p>

<figure class="highlight"><pre><code class="language-text" data-lang="text">bootm &lt;address of kernel&gt; &lt;address of ramdisk&gt; &lt;address of dtb&gt;</code></pre></figure>

<p>In our case, we are not using ramdisk so ‘-‘ in the middle.</p>

<figure class="highlight"><pre><code class="language-text" data-lang="text">bootm &lt;address of kernel&gt; - &lt;address of dtb&gt;</code></pre></figure>

<p>Here is the entire system.</p>

<p><img src="/assets/img/Kernel_booting.png" alt="Kernel_booting" /></p>

<p>Here is the root file system mounted.</p>

<p><img src="/assets/img/root_file_system.png" alt="Root file System Mounted" /></p>

<p><strong>FSBL based</strong></p>

<p>Instead of SPL image, you can use FSBL too. In order to generate 
FSBL, you need to use Xilinx SDK. Also, I will suggest that it is a better idea to enable FSBL_DEBUG_INFO in order to see whether FSBL is working or not. Here is how you enable the FSBL_DEBUG_INFO in order to troubleshoot the FSBL based image. I haven’t tried building up the entire system using FSBL. However, I was able to load the FSBL image successfully. Personally, I recommend to use SPL rather than FSBL.</p>

<p><img src="/assets/img/fsbl_build_settings.png" alt="FSBL Build Settings" /></p>

<p><img src="/assets/img/fsbl_debug_info.png" alt="FSBL Debug Info" /></p>

<p>Here is the link to download the tutorial for FSBL based AVNET ZYNQ-7010.</p>

<p><a href="https://drive.google.com/open?id=1RjMOyBuzkphg4NjYy28krqLvtYS29rfD">FSBL_Tutorial</a></p>

<p>I strongly suggest to use SPL image rather than FSBL since if you get
stuck with something then you have no support but to use peta-linux
only.</p>

<p>Here is the link to download the <a href="https://drive.google.com/open?id=10LsddxTvGmLnEsdgI-SYKYGNvOzIK-zc">ZedboardImage</a>.</p>

<p>Here are the jumper settings to change the boot mode to JTAG, QSPI or SD Card.</p>

<p><img src="/assets/img/ZEDBOARD_JUMPER_SETTINGS.png" alt="Zedboard Jumper Settings" /></p>

<p>Also, you can read the entire guide on setting.</p>

<p><a href="https://drive.google.com/open?id=1UcFAOTKosQ9m8bufOg3s5oGMPxCNyaVF">Zedboard reference guide</a></p>

<p>This brings an end to this article. Here is the entire embedded system running.</p>]]></content><author><name>Shreyas Joshi</name></author><category term="Embedded_Linux" /><summary type="html"><![CDATA[A historical Yocto Warrior walkthrough for building and booting Linux on an Avnet MicroZed Zynq board.]]></summary></entry><entry><title type="html">The Chain of Responsibility Pattern in C++</title><link href="https://joshis1.github.io/design_patterns/2018/06/04/Chain_Of_Responsibility_Pattern.html" rel="alternate" type="text/html" title="The Chain of Responsibility Pattern in C++" /><published>2018-06-04T21:13:31+00:00</published><updated>2018-06-04T21:13:31+00:00</updated><id>https://joshis1.github.io/design_patterns/2018/06/04/Chain_Of_Responsibility_Pattern</id><content type="html" xml:base="https://joshis1.github.io/design_patterns/2018/06/04/Chain_Of_Responsibility_Pattern.html"><![CDATA[<p>The Chain of Responsibility pattern lets a request pass through a sequence of handlers. A handler can process the request or pass it to the next handler, reducing the sender’s dependency on a specific receiver.</p>

<p>The C++ example below dispatches an enum value in one process. It is not an XMPP parser, transport, or security implementation.</p>

<p><strong>Difference between Structural and Behavioural Pattern</strong></p>
<ol>
  <li>
    <p>Structural Pattern talks about the relationship between entities. For
example, Façade Pattern and Adapter Pattern.</p>
  </li>
  <li>
    <p>Behavioural Pattern talks about how these entities communicate with each
other. For example, Strategy Pattern and Observer Pattern.
In the “Chain of Responsibility Principle”, we talk about how the command from
the client is delegated from one object to another. This talks about how the
message is delegated ( communicated) from one object to another. A chain
of responsibility decouples the sender and receiver. A sender will just post the
command on the pipeline. The objects which are connected to the pipeline will
either process the desired command or will just delegate to their next object.</p>
  </li>
</ol>

<p><strong>Task:</strong>
A STB will receive the XMPP commands, the commands are for various
sub-modules. For example, reboot the box – by Power Manager of the box,
HDD health – by Storage Manager of the box, and code download – by the
Software Upgrade Manager of the box. Adding a handler can avoid changes to
existing handlers, but new command types and registrations still require
updates to the system.</p>

<p><strong>Solution/Discussion:</strong>
These entities are totally disconnected. For example,
Power Manager and Storage Manager have entirely different purpose. We
don’t want sender to be coupled with the receiver. The sender can just
dispatch the message/command to the pipeline and forget. The object that is
connected to the pipeline will either process or delegate the command to the
next object. In order to synthesis this kind of behavior, we need to implement
‘Chain of Responsibility’ principle.</p>

<p>A ‘Chain of Responsibility’ principle implements a singly linked list. Here, all the objects are connected with each other. A message/command is dispatched to
the head node of the singly linked list. If the head node cannot handle the
command/message, then it will delegate to its next object . This way, the
message/command is delegated from one node to another unless the
message can be handled by the appropriate object.</p>

<p><strong>Design of Chain of Responsibility Principle.</strong></p>

<p><img src="/assets/img/COR_UML.png" alt="COR_UML" /></p>

<p><strong>Chain of Responsibility</strong></p>

<p><strong>How to implement the behavioural pattern to realise ‘Chain of
Responsibility’ design pattern here?</strong></p>

<ol>
  <li>
    <p>XMPP command Enums – All the commands that can be supported by the
STB system. We can always extend it.</p>
  </li>
  <li>
    <p>XMPP Stanza – This is the base class – head node for the chain of
responsibility principle i.e. singly linked list. A command/message will always be dispatched first to this head node of the pipeline. If the message cannot be handled, then it will call it’s next object to handle it. This way, the message will be delegated to next object unless the message can be handled. This class should have a routine/method to build the singly linked list i.e next pointer.
A client will dispatch the XMPP commands to this class object only. Also, it will
register itself with this class. Internally, during registration, it will append the new object into its singly linked list. Also, this class will have a
virtual method to handle the message. This class will just delegate the message to its next object .</p>
  </li>
  <li>
    <p>XMPP – pipeline objects – These can be extended easily. For the given
problem, the XMPP pipeline objects are – codeDownProcessor,
hddDiagnosticsProcessor, and rebootStbProcessor. Each of these objects
will implement the virtual method to handle the message. If any of the object
cannot handle the message, then it will call the head node/super class/base
class to delegate the message to its next object.</p>
  </li>
  <li>
    <p>client – The client will create all the pipeline objects and the base object i.e. XMPP Stanza. All the pipeline objects will be registered with the head node i.e. XMPP Stanza. As discussed earlier, during registration, the head node/base
class will append the pipeline object to its singly linked list.</p>
  </li>
</ol>

<p>Here is the code for each class.</p>

<ul>
  <li>XMPP command Enums</li>
</ul>

<figure class="highlight"><pre><code class="language-cpp" data-lang="cpp">  <span class="cp">#ifndef XMPPCOMMANDS_H
</span>  <span class="cp">#define XMPPCOMMANDS_H
</span>  <span class="k">enum</span> <span class="n">xmppCommands</span>
  <span class="p">{</span>
    <span class="n">codeDownloadProcess</span><span class="p">,</span>
    <span class="n">hddDiagnosticsProcess</span><span class="p">,</span>
    <span class="n">rebootStbProcess</span><span class="p">,</span>
    <span class="n">MAX_COMMAND</span>
  <span class="p">};</span>
<span class="c1">// XMPPCOMMANDS_H</span>
  <span class="cp">#endif</span></code></pre></figure>

<ul>
  <li>XMPP Stanza – Head node/ Super Class/ Base class</li>
</ul>

<figure class="highlight"><pre><code class="language-cpp" data-lang="cpp">  <span class="cp">#ifndef XMPPSTANZA_H
</span>  <span class="cp">#define XMPPSTANZA_H
</span>  <span class="cp">#include</span> <span class="cpf">"XmppCommands.h"</span><span class="cp">
</span>  <span class="cp">#include</span> <span class="cpf">&lt;QDebug&gt;</span><span class="cp">
</span>  <span class="k">class</span> <span class="nc">XmppStanza</span>
  <span class="p">{</span>
    <span class="nl">private:</span>
      <span class="n">XmppStanza</span> <span class="o">*</span> <span class="n">m_pnext</span><span class="p">;</span>
    <span class="nl">public:</span>
      <span class="n">XmppStanza</span><span class="p">()</span>
      <span class="p">{</span>
        <span class="n">m_pnext</span> <span class="o">=</span> <span class="nb">NULL</span><span class="p">;</span>
      <span class="p">}</span>
      <span class="o">/**</span> <span class="n">build</span> <span class="n">a</span> <span class="n">singly</span> <span class="n">linked</span> <span class="n">list</span> <span class="o">**</span> <span class="o">/</span>
      <span class="kt">void</span> <span class="n">addNextStanzaProcessor</span><span class="p">(</span><span class="n">XmppStanza</span> <span class="o">*</span> <span class="n">next</span><span class="p">)</span>
      <span class="p">{</span>
        <span class="k">if</span><span class="p">(</span> <span class="n">m_pnext</span><span class="p">)</span>
        <span class="p">{</span>
          <span class="n">m_pnext</span><span class="o">-&gt;</span><span class="n">addNextStanzaProcessor</span><span class="p">(</span><span class="n">next</span><span class="p">);</span>
        <span class="p">}</span>
        <span class="k">else</span>
        <span class="p">{</span>
          <span class="n">m_pnext</span> <span class="o">=</span> <span class="n">next</span><span class="p">;</span>
        <span class="p">}</span>
      <span class="p">}</span>

      <span class="k">virtual</span> <span class="kt">void</span> <span class="n">processStanza</span><span class="p">(</span><span class="n">xmppCommands</span> <span class="n">commands</span><span class="p">)</span>
      <span class="p">{</span>
        <span class="k">if</span><span class="p">(</span> <span class="n">m_pnext</span> <span class="p">)</span>
        <span class="p">{</span>   
          <span class="n">m_pnext</span><span class="o">-&gt;</span><span class="n">processStanza</span><span class="p">(</span><span class="n">commands</span><span class="p">);</span>
        <span class="p">}</span>
      <span class="p">}</span>
      <span class="k">virtual</span> <span class="o">~</span><span class="n">XmppStanza</span><span class="p">()</span>
      <span class="p">{</span>
        <span class="n">qDebug</span><span class="p">()</span><span class="o">&lt;&lt;</span><span class="s">"Destructor of Xmpp Stanza is invoked"</span><span class="p">;</span>
      <span class="p">}</span>
<span class="p">};</span>
  <span class="cp">#endif // XMPPSTANZA_H</span></code></pre></figure>

<ul>
  <li>Pipeline Object – codeDownProcessor.</li>
</ul>

<figure class="highlight"><pre><code class="language-cpp" data-lang="cpp"><span class="cp">#ifndef CODEDOWNLOADPROCESSOR_H
#define CODEDOWNLOADPROCESSOR_H
#include</span> <span class="cpf">"XmppCommands.h"</span><span class="cp">
#include</span> <span class="cpf">"XmppStanza.h"</span><span class="cp">
#include</span> <span class="cpf">&lt;QDebug&gt;</span><span class="cp">
</span><span class="k">class</span> <span class="nc">codeDownloadProcessor</span> <span class="o">:</span> <span class="k">public</span> <span class="n">XmppStanza</span>
<span class="p">{</span>
  <span class="nl">private:</span>
  <span class="nl">public:</span>
      <span class="n">codeDownloadProcessor</span><span class="p">()</span>
      <span class="p">{</span>
        <span class="n">qDebug</span><span class="p">()</span><span class="o">&lt;&lt;</span><span class="s">"codeDownloadProcessor constructor inovked"</span><span class="p">;</span>
      <span class="p">}</span>
      <span class="o">~</span><span class="n">codeDownloadProcessor</span><span class="p">()</span>
      <span class="p">{</span>
        <span class="n">qDebug</span><span class="p">()</span><span class="o">&lt;&lt;</span><span class="s">"codeDownloadProcessor destructor inovked"</span><span class="p">;</span>
      <span class="p">}</span>
      <span class="k">virtual</span> <span class="kt">void</span> <span class="n">processStanza</span><span class="p">(</span><span class="n">xmppCommands</span> <span class="n">commands</span><span class="p">)</span>
      <span class="p">{</span>
        <span class="k">if</span><span class="p">(</span> <span class="n">commands</span> <span class="o">==</span> <span class="n">codeDownloadProcess</span><span class="p">)</span>
        <span class="p">{</span>
          <span class="n">qDebug</span><span class="p">()</span><span class="o">&lt;&lt;</span><span class="s">"Downloading the Image!!!"</span><span class="p">;</span>
        <span class="p">}</span>
        <span class="k">else</span>
        <span class="p">{</span>
          <span class="o">/**</span> <span class="n">delegate</span> <span class="n">the</span> <span class="n">command</span> <span class="o">**</span> <span class="o">/</span>
          <span class="n">qDebug</span><span class="p">()</span><span class="o">&lt;&lt;</span><span class="s">"codeDownloadProcessor delegating"</span><span class="p">;</span>
          <span class="n">XmppStanza</span><span class="o">::</span><span class="n">processStanza</span><span class="p">(</span><span class="n">commands</span><span class="p">);</span>
        <span class="p">}</span>
      <span class="p">}</span>
<span class="p">};</span>
<span class="cp">#endif // CODEDOWNLOADPROCESSOR_H</span></code></pre></figure>

<ul>
  <li>Pipeline Object – hddDiagnosticsProcessor.</li>
</ul>

<figure class="highlight"><pre><code class="language-cpp" data-lang="cpp"><span class="cp">#ifndef HDDDIAGNOSTICSPROCESS_H
#define HDDDIAGNOSTICSPROCESS_H
#include</span> <span class="cpf">"XmppCommands.h"</span><span class="cp">
#include</span> <span class="cpf">"XmppStanza.h"</span><span class="cp">
#include</span> <span class="cpf">&lt;QDebug&gt;</span><span class="cp">
</span><span class="k">class</span> <span class="nc">hddDiagnosticsProcessor</span> <span class="o">:</span> <span class="k">public</span> <span class="n">XmppStanza</span>
<span class="p">{</span>
  <span class="nl">private:</span>
  <span class="nl">public:</span>
    <span class="n">hddDiagnosticsProcessor</span><span class="p">()</span>
    <span class="p">{</span>
      <span class="n">qDebug</span><span class="p">()</span><span class="o">&lt;&lt;</span><span class="s">"hddDiagnosticsProcessor constructor inovked"</span><span class="p">;</span>
    <span class="p">}</span>
    <span class="o">~</span><span class="n">hddDiagnosticsProcessor</span><span class="p">()</span>
    <span class="p">{</span>
      <span class="n">qDebug</span><span class="p">()</span><span class="o">&lt;&lt;</span><span class="s">"hddDiagnosticsProcessor destructor inovked"</span><span class="p">;</span>
    <span class="p">}</span>
    <span class="k">virtual</span> <span class="kt">void</span> <span class="n">processStanza</span><span class="p">(</span><span class="n">xmppCommands</span> <span class="n">commands</span><span class="p">)</span>
    <span class="p">{</span>
      <span class="k">if</span><span class="p">(</span> <span class="n">commands</span> <span class="o">==</span> <span class="n">hddDiagnosticsProcess</span><span class="p">)</span>
      <span class="p">{</span>
        <span class="n">qDebug</span><span class="p">()</span><span class="o">&lt;&lt;</span><span class="s">"Getting the Health of HDD!!!"</span><span class="p">;</span>
      <span class="p">}</span>
      <span class="k">else</span>
      <span class="p">{</span>
        <span class="o">/**</span> <span class="n">delegate</span> <span class="n">the</span> <span class="n">command</span> <span class="o">**</span> <span class="o">/</span>
        <span class="n">qDebug</span><span class="p">()</span><span class="o">&lt;&lt;</span><span class="s">"hddDiagnosticsProcessor delegating"</span><span class="p">;</span>
        <span class="n">XmppStanza</span><span class="o">::</span><span class="n">processStanza</span><span class="p">(</span><span class="n">commands</span><span class="p">);</span>  
      <span class="p">}</span>
    <span class="p">}</span>
<span class="p">};</span>
<span class="cp">#endif // HDDDIAGNOSTICSPROCESS_H</span></code></pre></figure>

<ul>
  <li>Pipeline Object – rebootStbProcessor.</li>
</ul>

<figure class="highlight"><pre><code class="language-cpp" data-lang="cpp"><span class="cp">#ifndef REBOOTSTBPROCESSOR_H
#define REBOOTSTBPROCESSOR_H
#include</span> <span class="cpf">"XmppCommands.h"</span><span class="cp">
#include</span> <span class="cpf">"XmppStanza.h"</span><span class="cp">
#include</span> <span class="cpf">&lt;QDebug&gt;</span><span class="cp">
</span><span class="k">class</span> <span class="nc">rebootStbProcessor</span> <span class="o">:</span> <span class="k">public</span> <span class="n">XmppStanza</span>
<span class="p">{</span>
  <span class="nl">private:</span>
  <span class="nl">public:</span>
    <span class="n">rebootStbProcessor</span><span class="p">()</span>
    <span class="p">{</span>
      <span class="n">qDebug</span><span class="p">()</span><span class="o">&lt;&lt;</span><span class="s">"rebootStbProcessor constructor inovked"</span><span class="p">;</span>
    <span class="p">}</span>
    <span class="o">~</span><span class="n">rebootStbProcessor</span><span class="p">()</span>
    <span class="p">{</span>
      <span class="n">qDebug</span><span class="p">()</span><span class="o">&lt;&lt;</span><span class="s">"rebootStbProcessor destructor inovked"</span><span class="p">;</span>
    <span class="p">}</span>
    <span class="k">virtual</span> <span class="kt">void</span> <span class="n">processStanza</span><span class="p">(</span><span class="n">xmppCommands</span> <span class="n">commands</span><span class="p">)</span>
    <span class="p">{</span>
      <span class="k">if</span><span class="p">(</span> <span class="n">commands</span> <span class="o">==</span> <span class="n">rebootStbProcess</span><span class="p">)</span>
      <span class="p">{</span>
        <span class="n">qDebug</span><span class="p">()</span><span class="o">&lt;&lt;</span><span class="s">"Rebooting the STB!!!"</span><span class="p">;</span>
      <span class="p">}</span>
      <span class="k">else</span>
      <span class="p">{</span>
        <span class="o">/**</span> <span class="n">delegate</span> <span class="n">the</span> <span class="n">command</span> <span class="o">**</span> <span class="o">/</span>
        <span class="n">qDebug</span><span class="p">()</span><span class="o">&lt;&lt;</span><span class="s">"rebootStbProcessor delegating"</span><span class="p">;</span>
        <span class="n">XmppStanza</span><span class="o">::</span><span class="n">processStanza</span><span class="p">(</span><span class="n">commands</span><span class="p">);</span>
      <span class="p">}</span>
    <span class="p">}</span>
<span class="p">};</span>
<span class="cp">#endif // REBOOTSTBPROCESSOR_H</span></code></pre></figure>

<ul>
  <li>Client</li>
</ul>

<figure class="highlight"><pre><code class="language-cpp" data-lang="cpp"><span class="cp">#include</span> <span class="cpf">&lt;QtCore/QCoreApplication&gt;</span><span class="cp">
#include</span> <span class="cpf">"XmppCommands.h"</span><span class="cp">
#include</span> <span class="cpf">"XmppStanza.h"</span><span class="cp">
#include</span> <span class="cpf">"codeDownloadProcessor.h"</span><span class="cp">
#include</span> <span class="cpf">"hddDiagnosticsProcessor.h"</span><span class="cp">
#include</span> <span class="cpf">"rebootStbProcessor.h"</span><span class="cp">
</span><span class="kt">int</span> <span class="nf">main</span><span class="p">(</span><span class="kt">int</span> <span class="n">argc</span><span class="p">,</span> <span class="kt">char</span> <span class="o">*</span> <span class="n">argv</span><span class="p">[])</span>
<span class="p">{</span>
  <span class="n">QCoreApplication</span> <span class="n">a</span><span class="p">(</span><span class="n">argc</span><span class="p">,</span> <span class="n">argv</span><span class="p">);</span>
  <span class="n">XmppStanza</span> <span class="n">xmppCmds</span><span class="p">;</span>
  <span class="n">codeDownloadProcessor</span> <span class="n">xmppSoftwareUpgrade</span><span class="p">;</span>
  <span class="n">hddDiagnosticsProcessor</span> <span class="n">xmppHddHealth</span><span class="p">;</span>
  <span class="n">rebootStbProcessor</span> <span class="n">xmppRebootStb</span><span class="p">;</span>
  <span class="n">xmppCmds</span><span class="p">.</span><span class="n">addNextStanzaProcessor</span><span class="p">(</span><span class="o">&amp;</span><span class="n">xmppSoftwareUpgrade</span><span class="p">);</span>
  <span class="n">xmppCmds</span><span class="p">.</span><span class="n">addNextStanzaProcessor</span><span class="p">(</span><span class="o">&amp;</span><span class="n">xmppHddHealth</span><span class="p">);</span>
  <span class="n">xmppCmds</span><span class="p">.</span><span class="n">addNextStanzaProcessor</span><span class="p">(</span><span class="o">&amp;</span><span class="n">xmppRebootStb</span><span class="p">);</span>
  <span class="n">xmppCmds</span><span class="p">.</span><span class="n">processStanza</span><span class="p">(</span><span class="n">rebootStbProcess</span><span class="p">);</span>
  <span class="n">xmppCmds</span><span class="p">.</span><span class="n">processStanza</span><span class="p">(</span><span class="n">codeDownloadProcess</span><span class="p">);</span>
  <span class="n">xmppCmds</span><span class="p">.</span><span class="n">processStanza</span><span class="p">(</span><span class="n">hddDiagnosticsProcess</span><span class="p">);</span>
  <span class="n">xmppCmds</span><span class="p">.</span><span class="n">processStanza</span><span class="p">(</span><span class="n">MAX_COMMAND</span><span class="p">);</span>
  <span class="k">return</span> <span class="n">a</span><span class="p">.</span><span class="n">exec</span><span class="p">();</span>
<span class="p">}</span></code></pre></figure>

<p>Here is the output.</p>

<p><img src="/assets/img/COR_Output.png" alt="COR_Output" /></p>

<p>The example shows the basic delegation idea. A production dispatcher should also define how an unhandled command is reported, who owns each handler, and how handler lifetimes relate to the chain.</p>

<p>This brings an end to the topic of the Chain of Responsibility pattern.
Here is the entire code that can be downloaded.</p>

<p><a href="https://drive.google.com/open?id=19BCediyhqoeB7vQWyJZnhWbGlwrgZyj-">Source_code_COR_Pattern</a></p>]]></content><author><name>Shreyas Joshi</name></author><category term="Design_Patterns" /><summary type="html"><![CDATA[A C++ command-dispatch example that explains handlers, delegation, and trade-offs in a chain of responsibility.]]></summary></entry></feed>